In our How to Paint Everything series, we take a look at different armies of the Warhammer universe, examine their history and heraldry, and look at several different methods for painting them. With the release of Engine War, we’re taking a look at the towering mechanical warriors of the Imperium, Imperial Knights.
Who Are the Imperial Knights?
The Imperial Knights have a long history, stretching back to the Dark Age of Technology. The titanic suits of Knightly armour were part of colonial expeditions sent by man among the stars, serving as mobile war-engines which could be piloted by a single colonist and used to fend off hostile alien life. Over the centuries, these warriors developed a chivalric code mirroring the medieval Knightly orders of earth, and a feudal system developed on those “Knight Worlds” where they were present.
The Knight Worlds mostly weathered the storms of the Age of Strife, and with the Great Crusade once again bringing central control to the galaxy they were rediscovered, now fully descended into a type of crude feudalism. Some swore fealty to the new Imperium of Man, while others became tied to the Adeptus Mechanicus, creating two classes of Knightly household – those of the Questor Imperialis, or the Questor Mechanicus. Some Knights exist outside of the structure of the Knightly Households, and are known as Freeblades – whether because they’re too independent for the life of service, because their house was destroyed, because they failed to uphold their code of honour and now seek redemption, or for many other reasons.
Knights in the Horus Heresy split along similar lines to the rest of the Imperium, with some houses staying loyal while others swore to Horus. We talk about the Chaos Knights in our HTPE: Chaos Knights article here – this one is strictly for the guys who didn’t break their oaths like cowards!
Where to Read More
If you’re looking to read more about Imperial Knights, consider the following books:
- Kingsblade and Knightsblade by Andy Clark follows the knight houses of Adstrapool and starts with their attempt to retake the Imperial World of Donatos back from Word Bearers forces.
- Vengeful Spirit by Graham McNeill follows Horus directing his legion to attack the Knight World of Molech, home of houe Devine.
- Mechanicum by Graham McNeill covers the rebellion on Mars during the Horus Heresy, and features lots of knight-on-knight action.
- The short story Apex Predator by Gavin G Smith follows Imperial Knight pilot Sethana going up against Chaos Knights.
Playing Knights
You can read about playing Knights in our Start Competing: Imperial Knights article here. Sadly, Knights are a little too big to appear in Kill Team!
…yet
Painting Knights
The general techniques and assembly processes for painting a knight don’t change much but there’s still a lot that goes into painting one, from handling large areas of bare metal to the elaborate heraldry featured on the knight.
SRM’s Method
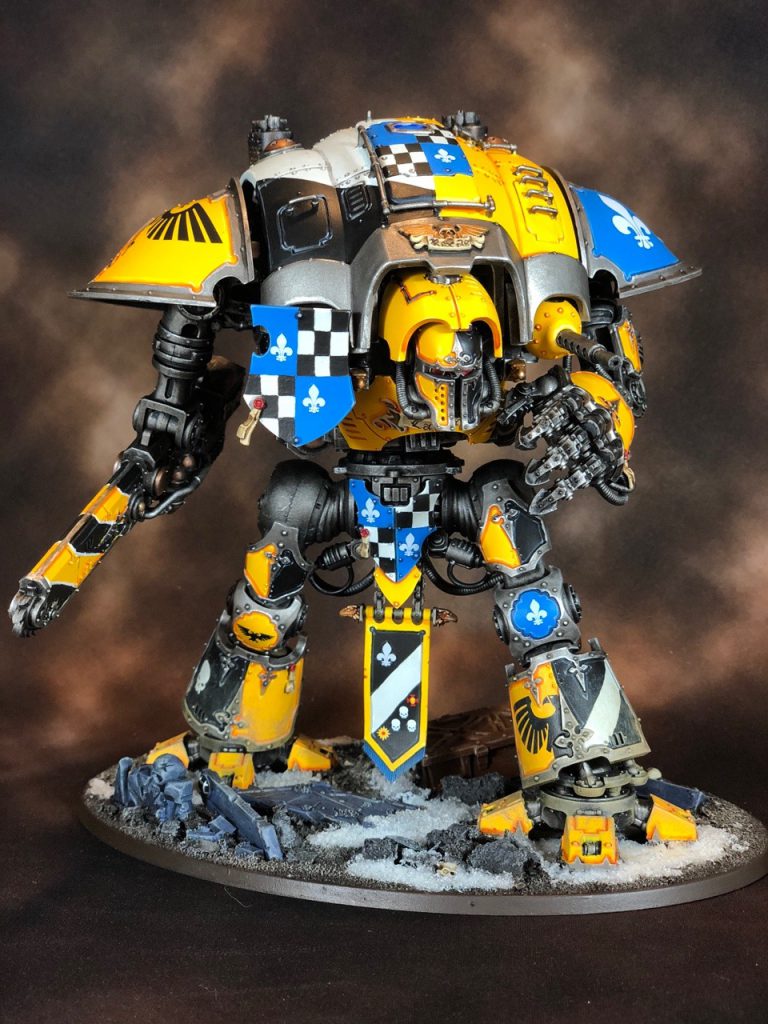
Consider my methods to be equal parts “how to” and “how not to”, as I made some frankly baffling mistakes while working on my Knight Household. The Knights of House Lakar got their own Army Showcase article back in December, and despite some hurdles came together in just a couple months. However, despite all the mistakes I made with this army, I would posit that painting the whole thing with brushes and rattlecans was not one of them.
The Skeleton
Inside all of us is a skeleton, it’s true. This (frightening!) fact is also true of the Imperial Knights kit, and is the most straightforward of all. The kit is easily assembled without any of its armor panels, meaning you can easily paint, base, wash, and drybrush the skeleton in about the amount of time it takes for 330ml of Nuln Oil to dry. With my first Knight I primed it with Army Painter’s Plate Mail Metal, but found that washes don’t really like to stick to metallic sprays, and touching up spots I missed was hard as I couldn’t color match it properly. On the rest of my Knights I primed with some Krylon matte black primer, covered the whole thing in a coat of Leadbelcher, and hit the skeleton up with two washes of Nuln Oil and one of Agrax Earthshade before drybrushing the whole thing with Necron Compound. Darkening them so much is good because it means you can use lighter metallics on the rest of the model to provide some contrast, and is instrumental in a scheme that uses silver trim like mine. This isn’t too different from GW’s recommended way of painting these so I won’t spend much longer on it, but getting some Biel-Tan Green wash on the pistons to represent some built up oil and grime adds a little bit of visual interest to those big metal bones.
Primer:
- Krylon Black
Knight Skeleton:
- Leadbelcher, this may take two coats to get even
- Nuln Oil wash all over
- Nuln Oil wash all over once more, with feeling
- Agrax Earthshade wash all over
- Targeted washes with Biel-Tan Green, Gryphonne Sepia, Druchii Violet or what have you to add some visual interest
- Necron Compound Drybrush
The Shell
This is where the mistakes really started. I had the bright idea to use Army Painter sprays to make painting those big blocks of color faster, and I got the associated Army Painter paints to cover up mistakes, touch up spots I missed, and so on. However, their Daemonic Yellow bottle paint had such poor coverage that I had my first Knight, Duchess Silas Magellan, hovering over the trashcan. With some encouragement from a friend I switched to GW’s Yriel Yellow and had a much better go of it.
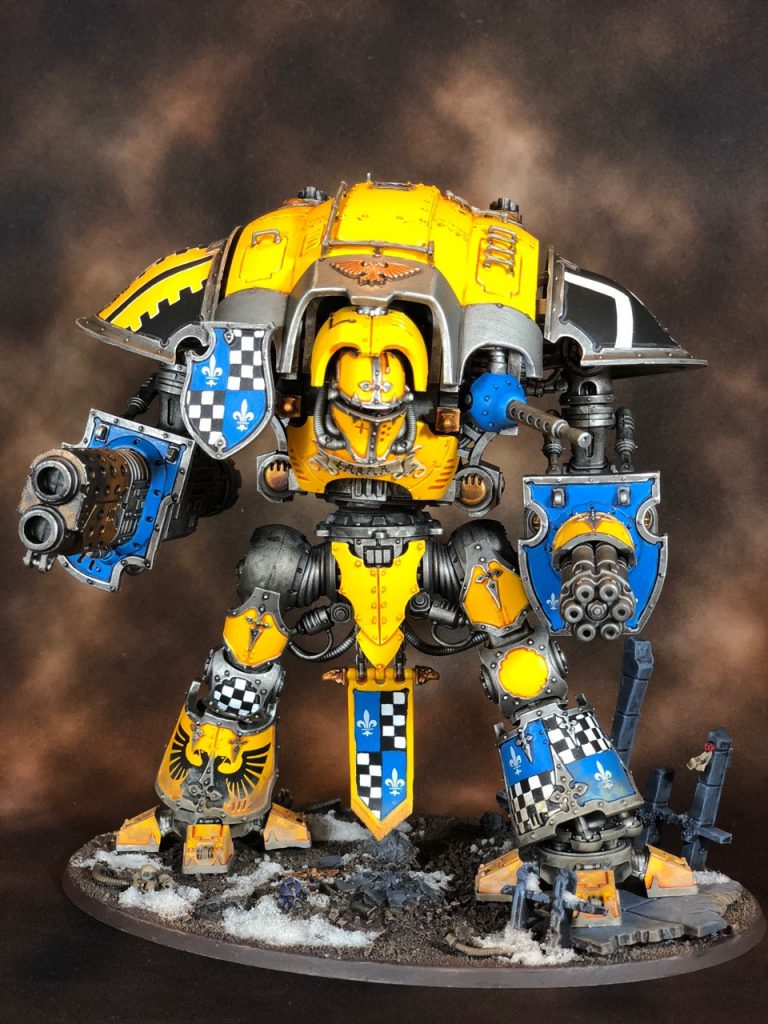
What I did instead for the rest of the household was prime white (again, Krylon matte white will do) and build up the layers in successive coats of thinned Yriel yellow. I built a bunch of little armatures on bases for the carapace bits using coat hangers, sprue offcuts, paperclips, whatever, and lightly used superglue on the inside of them so I could hold them in place. It was important to make a strong enough bond to hold the parts for painting, preferably in spots that wouldn’t be visible. This meant I wasn’t handling the pieces and rubbing paint off and could instead move them around and hold them on a base like a typical miniature. From here it was basically like painting a giant Space Marine – strong base color, washes in the recesses, and edge highlights on the edges. This then gets made more complex with the addition of halved/quartered scheme, trim, and heraldry. As I worked more with the army I worked in more black and white into the armor, both for visual contrast and to paint things up quicker.
Primer:
- Krylon White
Yellow Armor:
- Yriel Yellow, multiple thin coats are needed for this, even over yellow or white primer
- Fuegan Orange in the recesses and around each rivet. It might be necessary to clean this up with Yriel Yellow, as this needs to be clean
- Flash Jitz Yellow edge highlight
- Dorn Yellow at the very corners and rivets
Blue Armor:
- Army Painter Crystal Blue
- Drakenhof Nightshade in the recesses and around each rivet. Same story as the yellow.
- Calgar Blue edge highlight
- Fenrisian Grey at the very corners and rivets
Black Armor:
- P3 Thamar Black. This covers pretty well over white, so don’t worry about that.
- Eshin Grey edge highlight, and around the interior edge of armor panels. Again – like a giant Space Marine
- Dawnstone at the very corners and rivets
White Armor:
- Ulthuan Grey
- Nuln Oil in the recesses
- Corax White edge highlight
Trim:
- Leadbelcher
- Nuln Oil in the recesses
- Stormhost Silver edge highlight
The Heraldry
As some folks may be aware, I really, really like heraldry. This is where your big, flat panels of solid color can come to life, and your models can truly be made yours. I initially used some adhesive airbrush stencils and masking tape to initially make my heraldic designs, but found that my paint was either thick enough to leave visible lines where the paint met the stencil, or so thin as to run underneath it and ruin the whole look. Resultantly, I just freehanded the designs after the first Knight or so. Visually dividing the surface into a grid comes pretty naturally when there’s so many markers you can draw lines between. Linking rivet to rivet or vent to corner or what have you does a lot of the work for you, and from there it’s pretty simple to take some thin paint and draw a light line between point A and point B. Myself and many more talented painters wrote about painting up checks, dags, flames, and so on in a previous HTPE article, which I highly recommend. I kept mine all in the existing color scheme (yellow, blue, black, white) to keep my Knights loud, but not gaudy. The last step here was using decals. They add a lot of interest without a lot of work, and the Knight transfer sheet had a ton of good stuff already in it. My House Lakar scheme uses the fleur-de-lis as a repeating motif, which is now available on the Sisters of Battle transfer sheet but I was able to find some other ones, as it’s a pretty generic design. Once they’re applied, seal them with varnish and hit the feet up with some drybrushes to match your basing (Steel Legion Drab and Karak Stone in my case) and you’re ready to stomp off to war!
Corrode’s Method

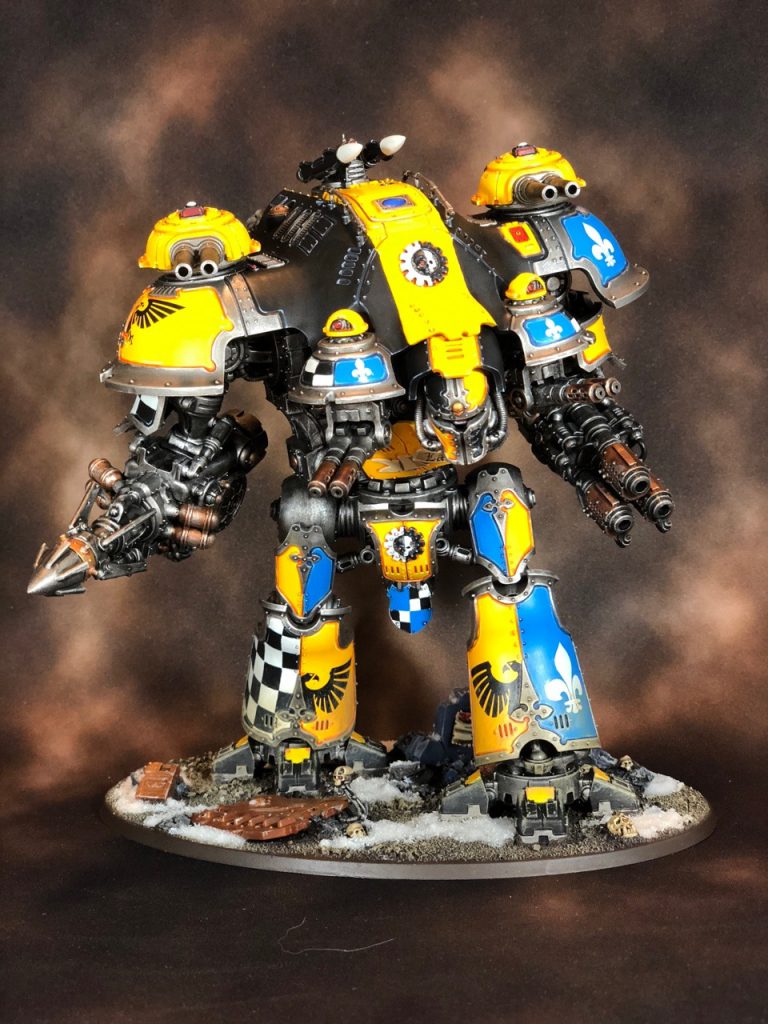
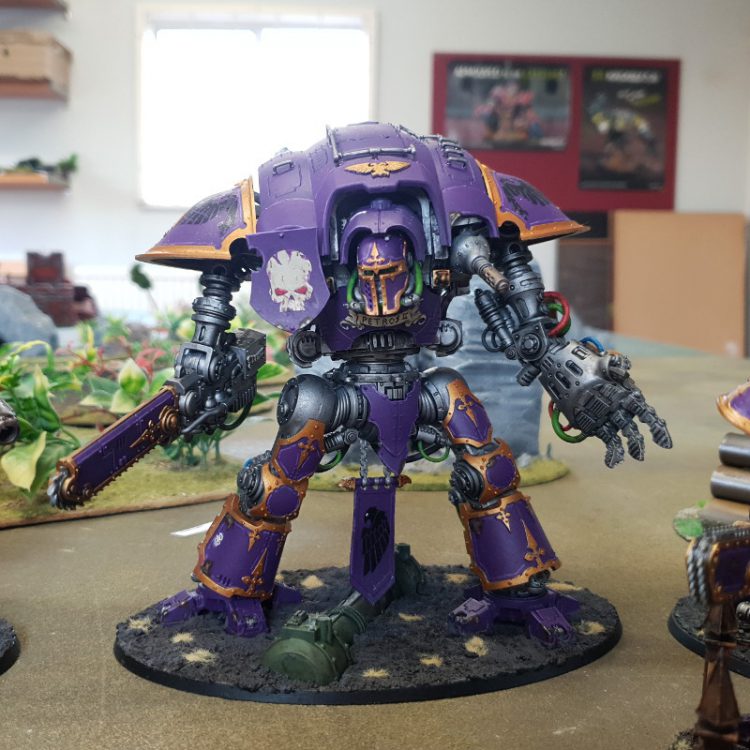
My Knights are House Constantinia, a Byzantine-themed Knight house, so there was only really one choice for the colours – purple and gold.
The skeleton was pretty simple, sprayed with the Army Painter metallic spray and then washed Nuln Oil. If I was going to do this again I’d probably use Leadbelcher which is overall a better colour, but that wasn’t what I did at the time. The armour is Naggaroth Night layered with Xereus Purple, with a line highlight of Genestealer Purple around the edges. I also added some chipping by painting in Rhinox Hide, then Mournfang Brown, and then Leadbelcher. The gold trim is just Retributor Armour Gold. It’s quite orangey and heavy but it works ok with the purple here.
I also added some decals. Something that I think worked out here was for the ones on the armour to be a little weathered and worn away, pretty much just by painting in a little of the Xereus Purple once the transfer was laid down.
Despite the size, the Knights are pretty simple to paint in my opinion. There’s a lot of them, but you can pick a simple but effective scheme and get them painted up quickly. Or you can be Campbell and paint huge areas of them yellow and then cover them in heraldry, whatever, you do you.
Jack Hunter’s Method
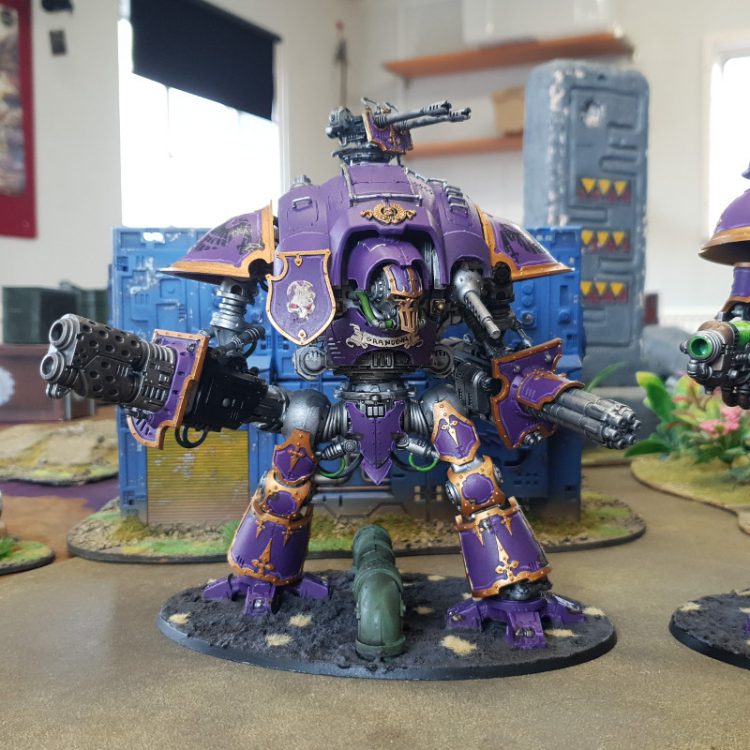
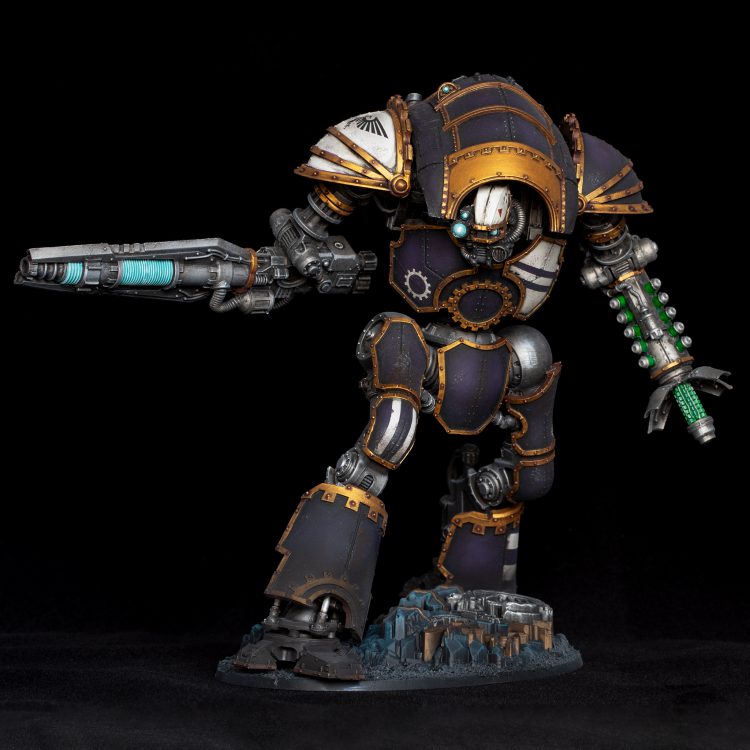
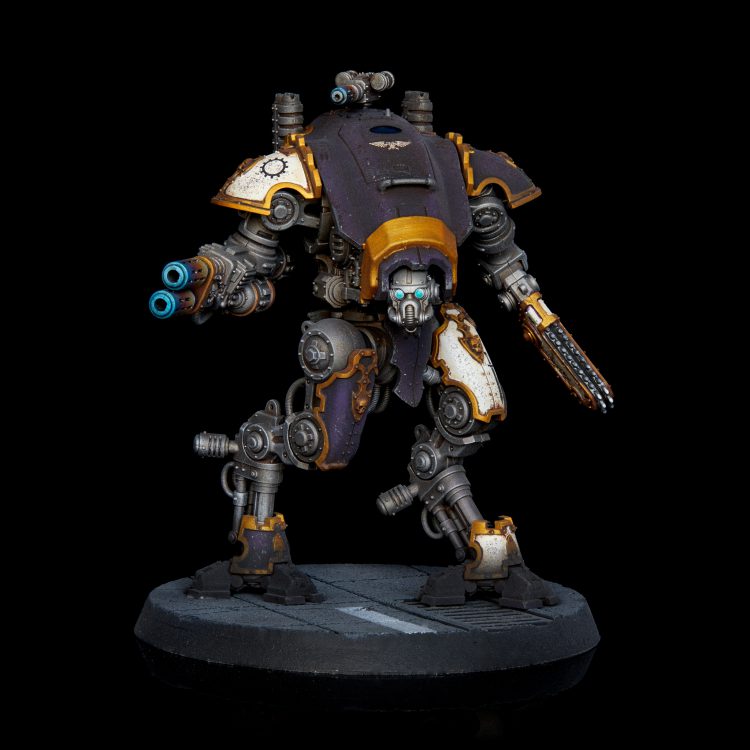
I painted this knight up to act as an escort to my Reaver titan. Unlike many titan legions, there hasn’t been any fluff related to knight houses they fight with, so I ended up deciding that the knights would run the same scheme as their bigger cousins. The same purple and white panels with gold accents scales down from the titan extremely well, giving me an opportunity to run one of my favorite schemes at a scale that’ll actually be in games.
The Skeleton
I painted the skeleton and most other silver metal bits in Vallejo Metal Color Steel, then hit them with a light zenithal pass from above with Vallejo Metal Color Duraluminum. Once that’s dry, I cover the whole thing with a thin oil wash that’s a mix of Burnt Umber and Lamp Black. After it’s dried for a while, I rub the whole thing down with a lint-free rag to buff it back off the upper surfaces, seal it, and do a light drybrush with Scale 75 Heavy Metal. The cooler tones of Heavy Metal contrast nicely with the warm tones from the oil wash to really make the legs pop. I don’t usually paint too many of the details, but I will go in and pick out any pistons in Vallejo Metal Color Chrome at the very end after I’ve done my weathering.
The Armor Panels
The very first thing I do is to start thinking about what kind of patterns I’m going to want to put on the armor plates, and priming any panels that will get any white with a white or light grey. I then cover those panels in Scale 75 White sands, and highlight with Vallejo Model Air White. I’ll paint the entirety of any panels that will have any white so I don’t run into any issues when masking of having missed an area. Once I’ve finished masking it off I prime any panels that haven’t been painted yet in black, and any of the panels that were already painted white just get hit with Vallejo Model Air White. I try not to put primer over masking tape, as it forms a much stronger film than the paint and is prone to peeling off poorly. I then start on my purples, a base of Reaper Deep Twilight, then successively smaller highlight areas of Reaper Imperial Purple and Reaper Twilight Purple (yes, if you look at the swaches online it looks weird).
Once all the armor plates are blocked in, I gloss varnish them, apply decals, and apply a satin varnish over that. If you don’t have satin, you can re-gloss and then do a light matte coat. The satin coat here gives a little more for our oil wash to bite into – it’s going to be a lot thicker than we put on before (almost more of a paint). Let it sit for a bit, then buff it back off, using a little bit of white spirits as needed on the centers of panels and highlight areas.
Weathering – Part 1
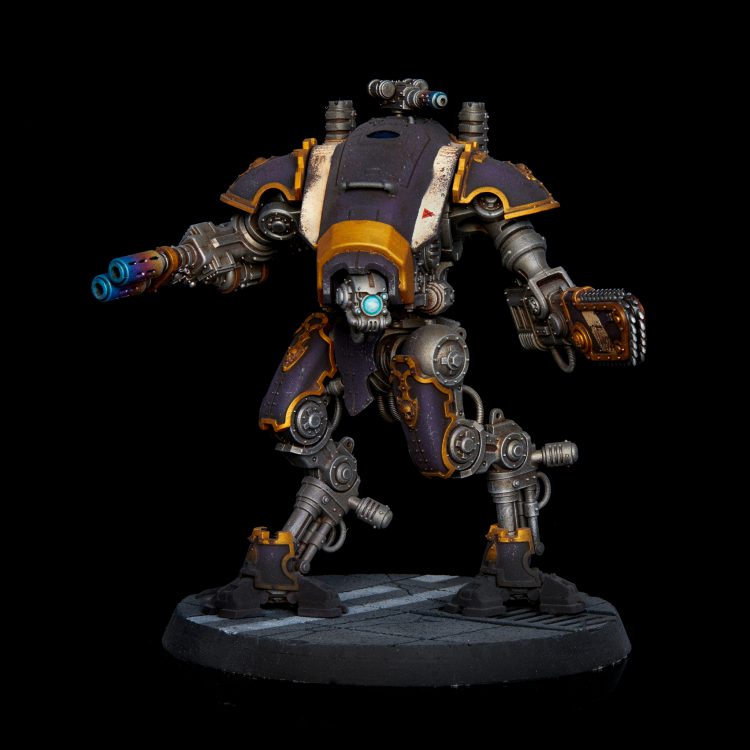
At this point I do some quick sponge weathering – first a very light pass with Imperial Purple or white over any decals to blend them in even more, then a slightly heavier pass with the same over plate edges (I do this instead of edge highlighting, as it looks more natural on a beat up model to have those edges dinged up). I then do a heavier sponge pass, concentrating anywhere that’s likely to get beat up, first with Rhinox Hide then again in any areas of Rhinox that ended up particularly heavy with Scale 75 Black Metal.
Gold Trim
My gold trim is all straight forward, just time consuming. It starts with Scale 75 Viking Gold, then I carefully wash around all the rivets and any recesses with Druchii Violet, then carefully go over everything but the washed areas with a few thin coats of Scale 75 Dwarven Gold. By not coating over the areas right next to the rivets I help smooth the transition into the washed areas and keep them looking darker. I do some final edge highlights with Scale 75 Citrine Alchemy where needed, but generally keep that to only the very highest areas.
Detailing
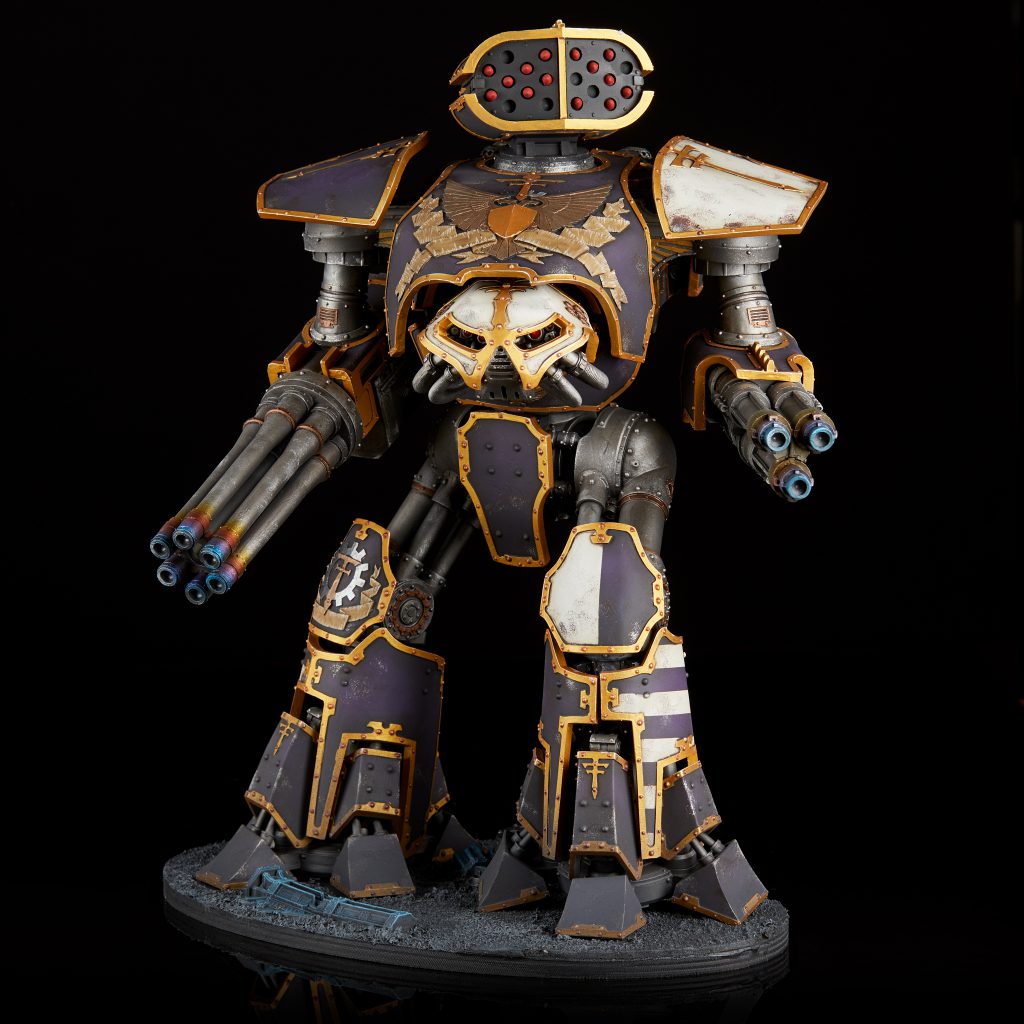
All the major areas are painted at this point, so all that’s left to do is the details. I wanted some extremely bright eyes, so they got painted white, then a coat of Aethermatic Blue around the outside edge, a second thinned coat of Aethermatic Blue over the entire eye, and the very center coated back again with white. On my Atropos, I used Aethermatic Blue and Warp Lightning over Grey Seer for the weapon glows.
Weathering – Part 2
The very last step before gluing the armor plates on and the knight down to the base is some extra weathering on the feet to tie it into the base. I lightly airbrushed a random medium grey over the bottom third of the legs and lower leg armor plates, then hit the same areas with a bit of Exhaust Black weathering pigments, before sealing the model up and doing the final matte varnish coat. As mentioned up in the leg section, this is when I paint pistons chrome and use a bit of Agrax Earthshade at the end to give the appearance of some oil.
Fin
Jack’s second, and shinier method.
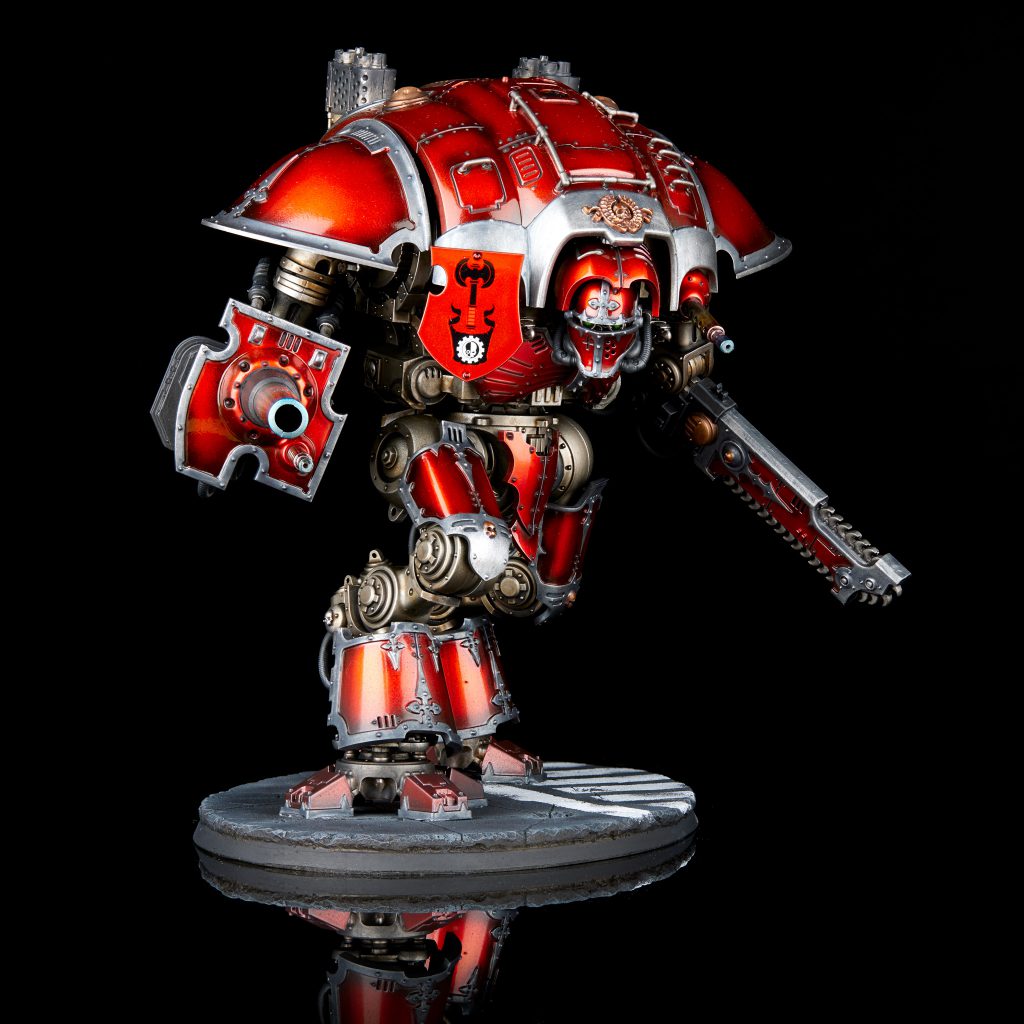
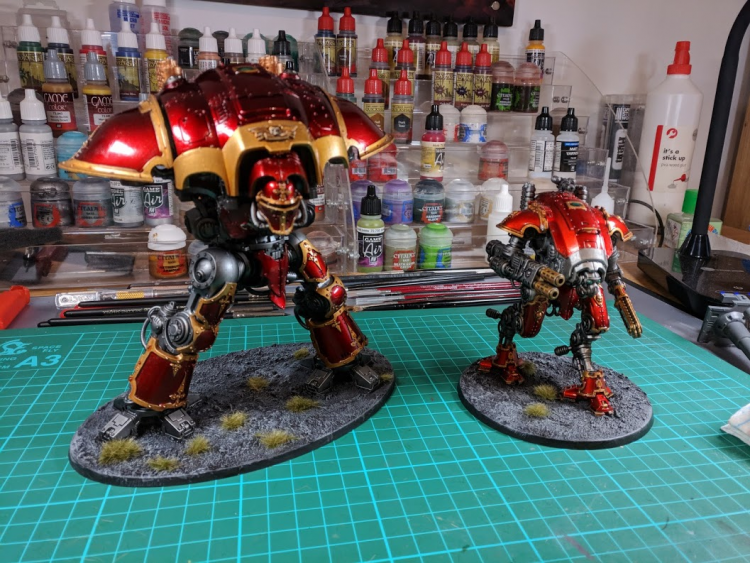
A few years back I picked up the Horus Heresy model masterclass book from Forgeworld, and the very first tutorial in it is for a beautiful candy red knight. This method is pulled pretty directly from there, and that book was just added to the Warhammer Vault. More details and step-by-step photos are available over there, this is just a high level overview, with a few slightly different paints as some are no longer available.
The key thing here is that all the armor plates need to be painted separately from the skeleton. It’s going to be a complete nightmare to do if things are assembled. I also left things like gun barrels off – the less that’s attached to the armor the better (with the exception of the handles on the upper carapace that I wouldn’t be able to glue on later without fucking things up).
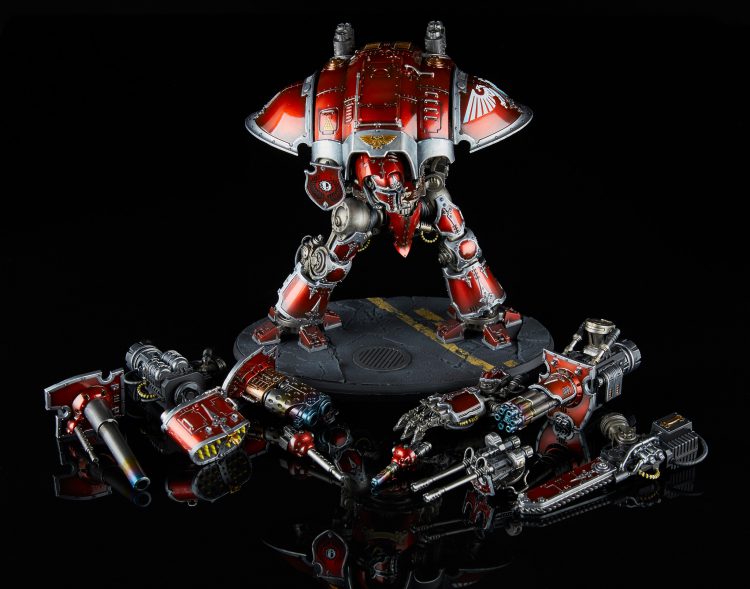
Over black primer I basecoated everything in Vallejo Metal Color Dark Aluminum, then highlighted with Vallejo Metal Color Aluminum. The armor panels got a heavier hit of this highlight than the skeleton, particularly the shoulders.
The skeleton is mostly handled with washes from here – first a complete coat of Nuln Oil, then Seraphim Sepia to represent oil stains around joints and bolts, then a couple patchy coats of a mix of Nuln Oil, Seraphim Sepia, and Lahmian Medium to build some variety.
The armor panels are the truly time intensive part of this process – I think I ended up with somewhere around 15 layers. I’m going to work entirely with the Citadel clear range, but Tamiya makes equivalent paints. I started by preshading the edges of panels with Calth Blue and Mortarion Green (with green being the darkest areas). The “fun” part of this comes now with repeated thin layers of Angron Red. Each layer progressively deepens the color, but reduces the contrast with the preshaded areas slightly. I kept adding layers until everything is nice and smooth and adding additional layers seemed to make minimal change to the depth of the red.
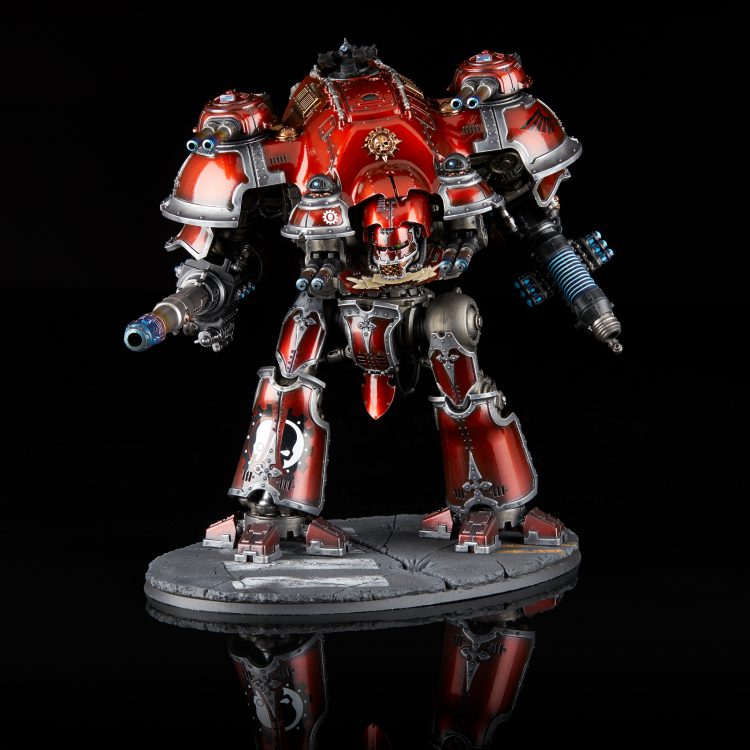
With the panels painted, I painted the trim with Iron Hands Steel, then washed with Drakenhof Nightshade. I skipped the recommended Nuln wash, as I thought the blue added enough contrast. On the larger areas I went back in with a drybrush of the Iron Hands Steel any patchness.
After painting all the details and assembling the armor plates onto the knight, I lightly airbrushed thinned Corvus Black onto the lower portions of the legs to tie it into the base.
Brin’s Method – Candy Red Knights
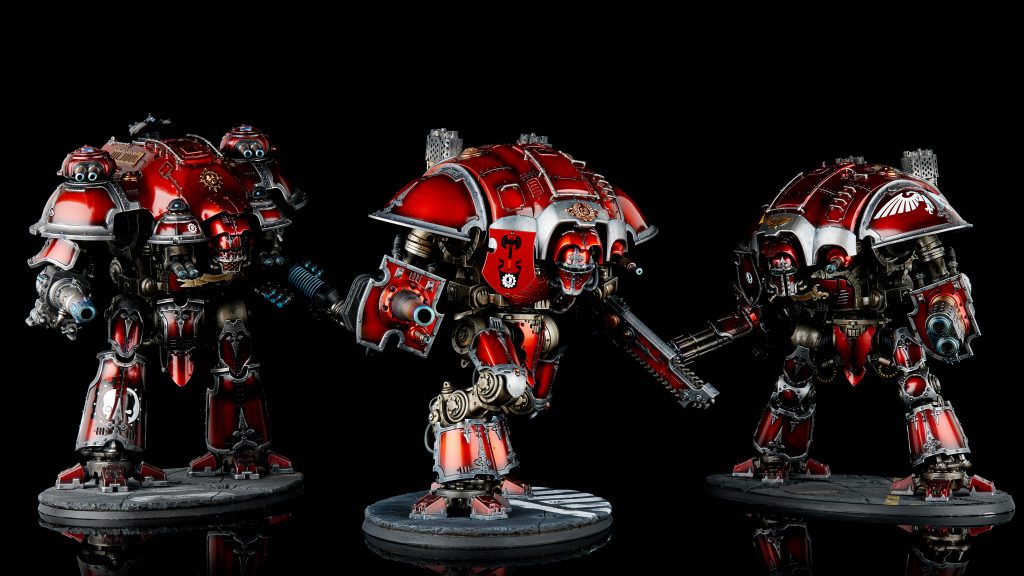
We begin with a coat of a bright gold on all the armour plates, in this case Vallejo Model Air Gold. Some people will suggest a silver but I find that the warmer undercoat of a gold will help the red shine even brighter.
We then wash with a warm red-brown wash such as Reikland Fleshshade, preferably a gloss one to preserve the shine of the metal, this shade will show through the layer above to help preserve the visibility of the shapes.
Next we spray with multiple thin coats of Tamiya Clear red, each coat will make the colour darker and more saturated, so we can vary how we want the final colour, anywhere from a very bright red down to a darker cherry red that will really highlight the shine more clearly.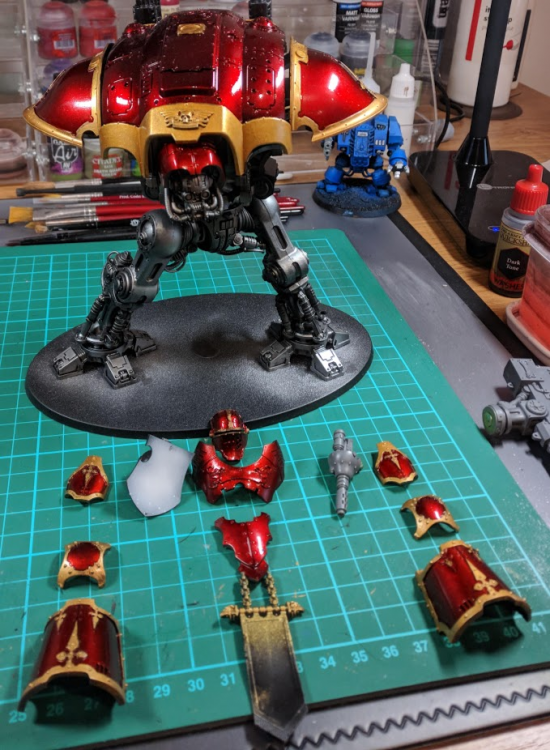
Then we can re-apply, shade and highlight the gold on the Trim and start to attach the armour on.
Primaris Kevin’s Method
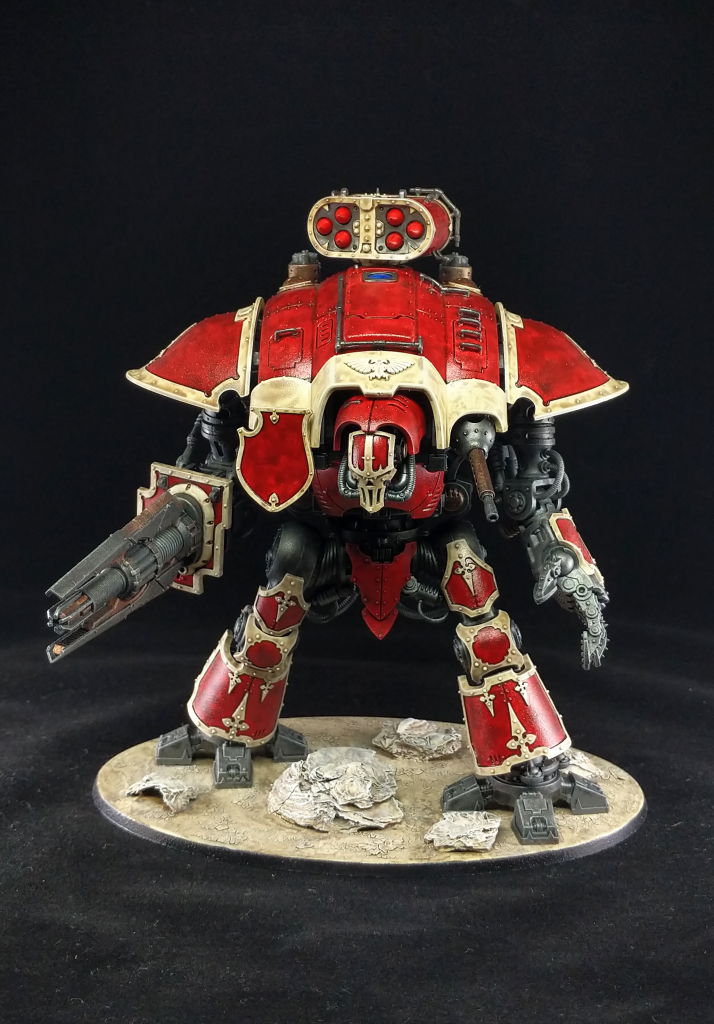
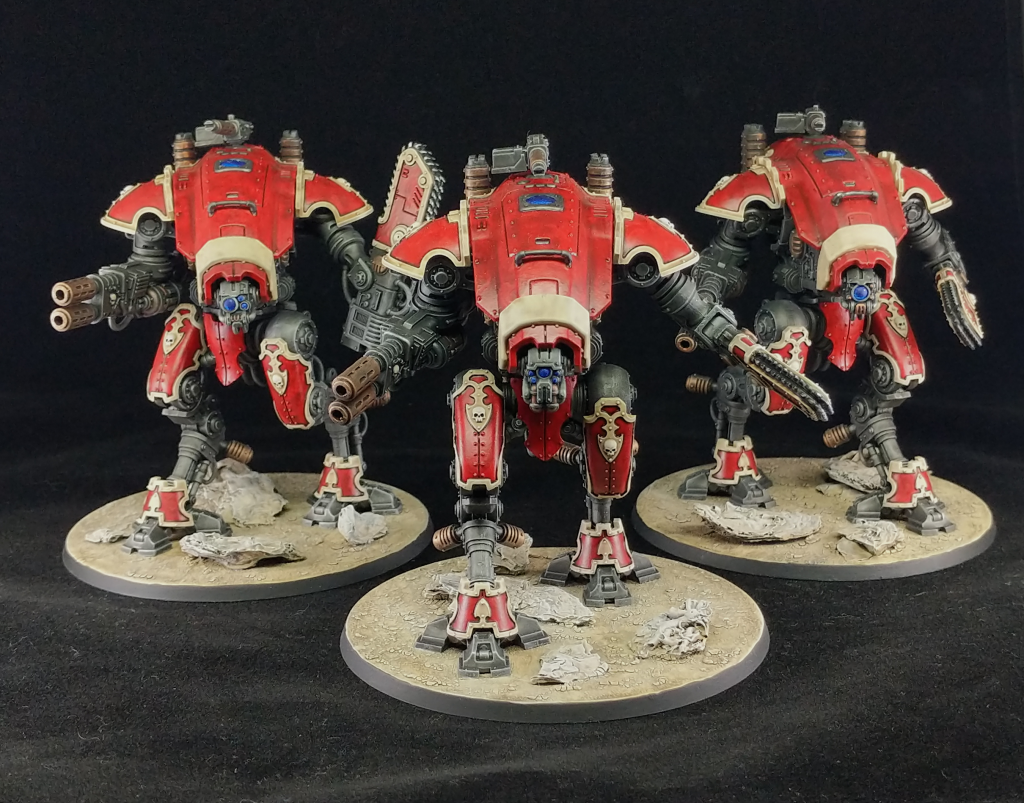
My original goal with these Knights (called the ‘Sanguine Lance’) was to quickly produce something that allowed me to bring 2000 points to the NOVA Open and would mesh well with my Regal Skulls Space Marine chapter. As a result I used the same desert base technique, only with larger pieces of oyster shell since there was more real estate to cover. I also used the same bone technique, and chose a deep red color to complement the purple of the Regal Skulls. You may notice that the las-impulsor isn’t the same as the one from Games Workshop; that was because when the Knight codex first came out the Preceptor kit hadn’t been released yet. So I modeled one in CAD software and 3D printed it on a resin printer. I feel confident that I am one of the first players to learn exactly how poorly a Knight Preceptor pays on the battlefield.
The Metal
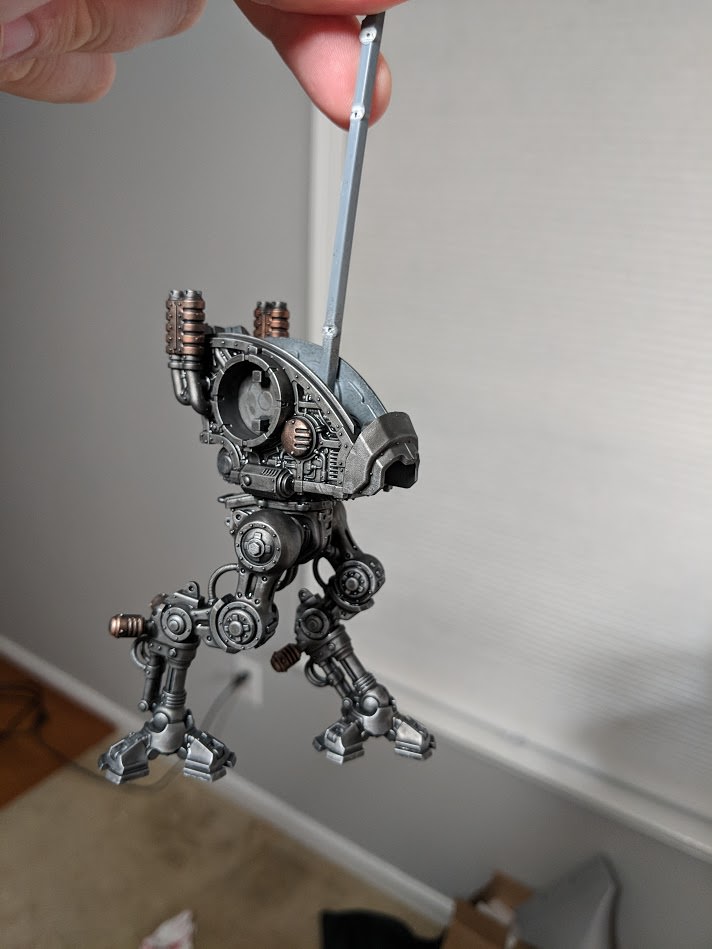
The majority of the model is a dark metal skeleton that lends itself well to being quickly painted using a drybrush and wash technique. For these models I wanted something that worked quickly but produced a lot of depth. I started by using my airbrush to prime with Badger Stynylrez gray, and then base coated with VMA Gunmetal. The copper pieces were base coated in VMA Copper but were otherwise treated the same as the other pieces. I washed the entire model with AP Dark Tone, drybrushed with VMA Dark Steel, and then applied another layer of AP Dark Tone. Finally I drybrushed with a layer of VGC Chainmail. I intentionally drybrushed with an airbrush paint for the middle layer because I find that the technique provides something between a glaze and an edge highlight and provides a very smooth transition.
The Bone
One of the best things about Knight models is that all of the plates are separate from the core chassis, so you can paint them without worrying about masking. As with the metal pieces these models were primed with an airbrushed layer of Stynylrez. I then airbrush a layer of VGA Bonewhite. Once the base layer is applied I apply a wash of Army Painter Soft Tone, after which I drybrush the VGA Bonewhite. As with the interim layer of VGA Steel this produces a nice glazing and edge highlighting effect. After the Bonewhite pass I dry brush with VMC White (any white will likely do). Note that this is not with an air paint; I want this stage to primarily hit the edges and brighten the whole model. It’s possible to be too aggressive with this stage; if it gets too bright apply a thin layer of Bonewhite mixed with AP Soft Tone to bring it down. One thing I wish I had done differently is to airbrush the AP Soft Tone instead of brush it on; it tends to pool on large flat surfaces and doesn’t work as well. I have found that a 50/50 blend of AP Soft Tone and Vallejo Flow Retarded does a great job of providing an easy to control coating.
The Red
The red starts off painted the same way as the bone so that I don’t have to worry about being careful. I then apply a base layer of Liquitex Ink! Pyrrole Red. If you haven’t tried the Liquitex Inks you really should; they are extremely inexpensive and do an incredible job of coating thanks to a massive quantity of pigments. A single layer is all you need. For this model I wanted to achieve a “mottled” effect, so after applying the ink I applied two washes of AP Red Tone. With the Red Tone I carefully manipulated the wash so that it would be heavier in some areas and lighter in others. Applying two coats ensures that there wouldn’t be any rough transitions. I then lined the edges where the red met bone with Liquitex Ink! Burnt Umber to provide a nice sharp transition.
The Blue
The final piece was the details on the lenses and the top access panel. I started with a foundation of white paint, and then used Liquitex Ink! Phthalocyanine Blue (Green Shade) mixed with white to gradually shade the lenses from white to blue. The ink takes awhile to try so you can achieve some really fun wet blending techniques if you’re patient. It’s also a very forgiving technique, as the thinned paint goes on very lightly and you can easily make corrections.
Andrew “Pendulin” Haywood’s Method
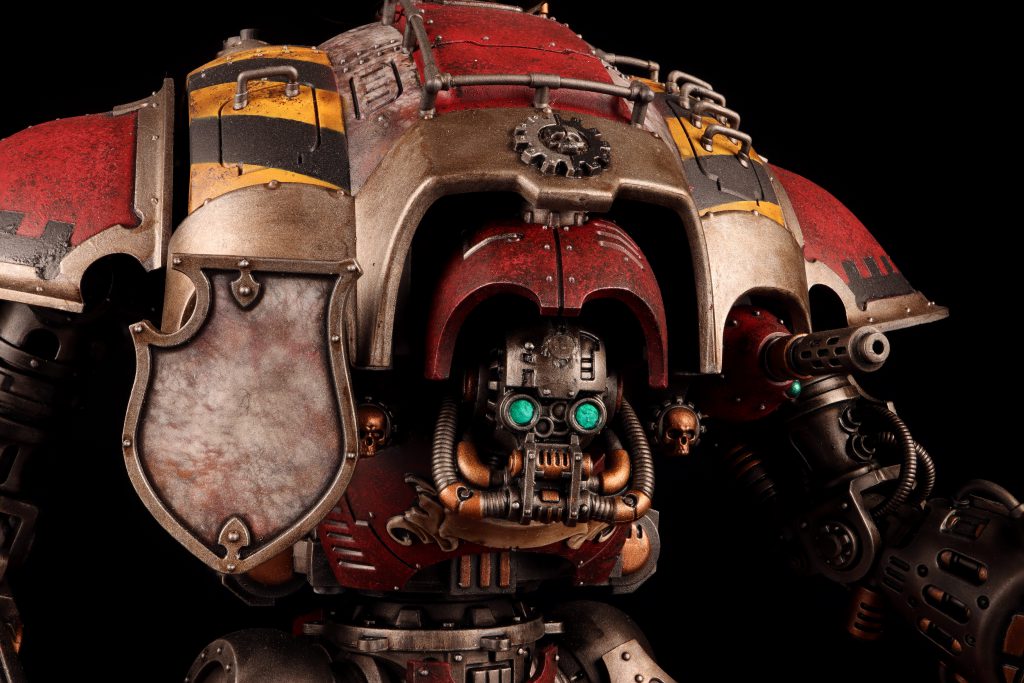
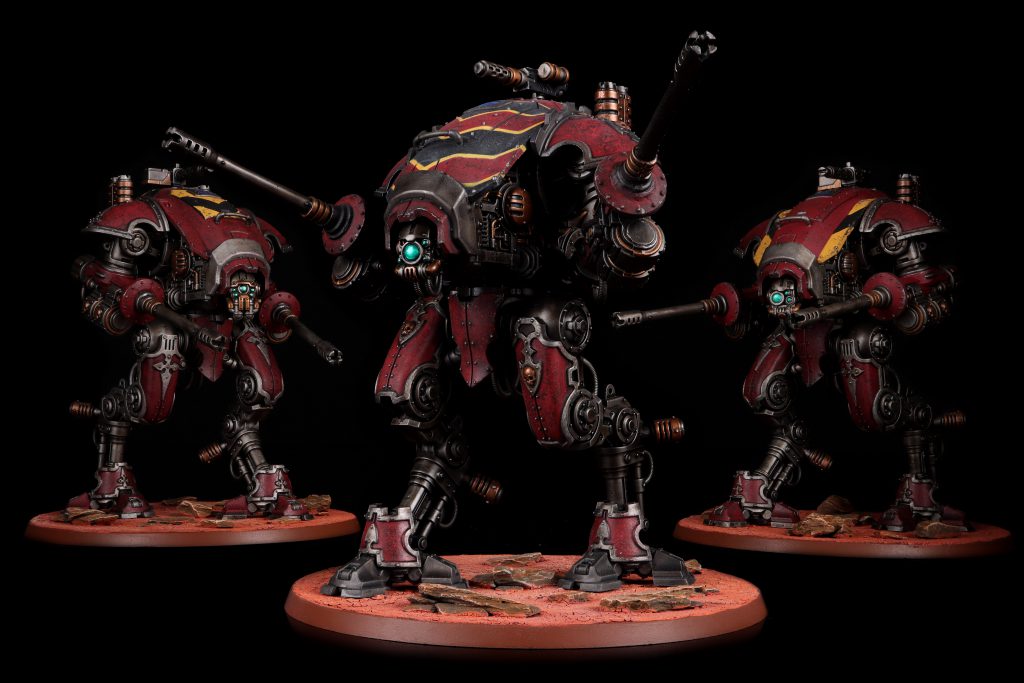
Imperial Knights are a joy to paint. Huge mechanized gearwork covered by large flat armor panels means you have a lot of surface area to experiment with different styles. Which is a blessing when an entire Imperial Knight army is no more than a handful of models (though strictly speaking, each Knight model is an entire handful by itself). To avoid an army that looks like four copy-paste operations, you can splash up the paint jobs to give each model their own individual flair.
I have no “one-size fits all” guide for Imperial Knights, but what I do have are a series of techniques I’ve used, frequently paired together, to create some interesting and memorable models. Let’s go over them, shall we:
Metal Skeleton
The metal skeleton starts off either as Leadbelcher spray, or as airbrushed Stynylrez Black followed by Vallejo Metal Color Steel. Those two approaches are fairly comparable, but I’ve found that Vallejo Metal Color Steel to be a touch darker and richer. Either way, then follow up by highlighting wires or accent pieces with Brass Scorpion. Then finish it off with a little bit of Nuln Oil and Agrax Earthshade.
Green Lenses
These lenses are just Stormhost Silver with Waystone Green on top of them. Maybe use just a touch of Nuln Oil along the edges to create a clear line around the lens. You can get the same iridescent effect with other colors by using other paints in the Citadel Technical paint line, specifically the gemstone colors: Spiritstone Red and Soulstone Blue.
Dirty Red Armor
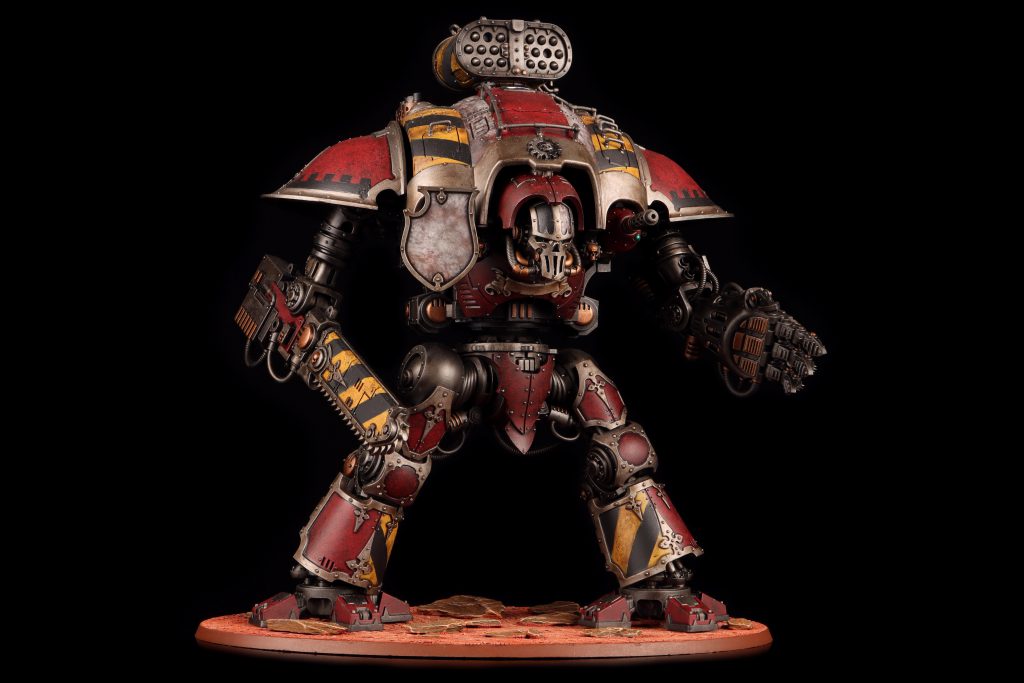
This is deceptively easy to paint. First paint Khorne Red as smooth as possible (with an airbrush, if you have one). Then, take a torn up bit of sponge brush, and stipple on Rhinox Hide, giving the whole armor panel an even, fairly dense speckling of it. Next, wash all the red/brown in Agrax Earthshade. Once that’s dry, grab the sponge again and this time stipple back on Khorne Red. If you want to go the extra mile, then stipple on some Leadbelcher on corners, edges, and anywhere the paint may have scratched off. The chipped paint look works better if the area surrounding the leadbelcher stipple is primarily Rhinox Hide, rather than Khorne Red. It gives that area a natural-looking transition from clean armor, to dirty armor, to chipped armor.
Dirty Black Armor
I found that starting with a base of black, following by lightly stippling on Eshin Grey worked quite well, no wash required. Somebody who knows more of color theory could explain why grey-over-black right next to brown-over-red works so well. But similar to the dirty red armor, you can stipple some Leadbelcher on corners, edges, and places with chipped paint.
Hazard Stripes
Airbrush + thin masking tape. Easy-peasy. Specifically though, I found going from black to yellow easier. Start by airbrushing Abaddon Black or Stynylrez Black, then mask off all the areas you don’t want to spray with yellow, and last airbrush Averland Sunset right over the black to create the yellow lines.
Note that you might need to do a handful of thin layers to get the yellow to look good, but don’t stress, it takes longer to mask the areas than it does to paint them. Pull the masking tape off, and then clean up the hazard lines with a traditional brush if necessary.
To go the extra mile, stipple on a little bit of Rhinox Hide on the yellow, and then wash it with Agrax Earthshade. Don’t worry too much about getting it on the black areas, but do NOT leave the masking tape on keep the wash out of the black areas. The wash will pool against the masking tape, and you’ll wind up with a thick layer of wash that separates your colors and it will look terrible. Once the wash is done, carefully stipple Averland Sunset back on top of the yellow areas, and optionally stipple Leadbelcher on the corners and edges where chipping may have occurred.
Marbled White Armor
This is a technique that’s going to require a lot of practice and fiddling to get to a desired result, but it’s extremely versatile and cool. You need two tools for this: an airbrush and dryer sheets (the thin sheets of fabric you can place in with wet clothes in a dryer machine). There are a million brands of dryer sheets, and I have no frame of reference as to whether one works better than another, as I just use an unlabeled box of sheets I’ve probably owned for over a decade now.
First run those dryer sheets under some water and scrub them down with more dryer sheets. Many of these sheets contain fragrance, powders, and other stuff you want nowhere near your models. You’ll want to work all of those out of the sheets, so the water runs through them clear and odor free. Let these fully dry before continuing.
Start with an even black layer (black primer is perfectly fine). Then stretch taught a dryer sheet over the area, almost as if you are trying to wrap the armor in saran wrap. Hold the dryer sheet there and airbrush Korne Red through it, creating a streaky, lined pattern. Repeat this with Skrag Brown, and then with White Scar. After all that, wash it in Nuln Oil and there you go!
What’s great about this is you can switch up those paints to create different effects. Try Skrag Brown first, then Korne Red. Or swap the red for a blue. Start with white and finish with a black. What do any of these look like? Who knows! Maybe they look perfect on your Imperial Knight!
Wrap-up
We hope you’ve enjoyed this tour of Imperial Knights paint schemes and all the various different approaches you can take. Knights are great to paint – simple techniques can make them look really good, but they’re also a great open canvas for a painter to take it the extra mile and really add their own flair, with lots of capacity for heraldry, weathering, and freehand. As always, if you have any questions, feedback, or models of your own to share, feel free to drop a note in the comments below or email us at contact@goonhammer.com.




You must be logged in to post a comment.