Hello again, Mali-folks!
It’s great to be back! As I mentioned last time, we’re awaiting Wyrd’s July errata with bated breath. While we wait, though, I’d like to discuss a topic that’s near and dear to my heart: how to unpack your crew.
This article, and future articles that I write under the Malifaux 102 header, are meant to be “second-stage” tactics articles: they’re targeted at players who have the basics down pat and are looking to level up their game. If you’re just starting out, I recommend you check out my beginner’s How Not to Lose article, or the Faction Focus appropriate to your master of choice.
What Is An Unpack?
How do you unpack your crew? Well, first you unzip your bag, and carefully remove the foam trays…
No, not that. The “unpack” is simply the sequence of actions you take at the top of Turn 1. It is how your crew sets up and prepares for the game ahead. How to unpack is a crucial skill; well begun, they say, is half done. Every crew unpacks differently, and understanding your crew’s unpack (or at least the options available to it) is the key to a smooth game. Once you get your unpack down pat, you will find Malifaux much easier, and your win rate will improve.
A sophisticated understanding of your unpack naturally develops alongside a sophisticated understanding of what your crew actually does to win games. It informs your hiring, your deployment, your scheme selection, and how the game plays out. It is therefore worth thinking about just what you hope to accomplish with your unpack, and what you need to do to accomplish that.
Shaking Out Your Suitcase: How to Unpack Like a Pro
Every crew in Malifaux is a unique and beautiful snowflake, and every crew’s unpack is unique, too. Some are quite simple: the Infamous keyword is generally just barreling forward at full speed. Some are very complex: the Wizz-Bang keyword is juggling self-damage, Glowy stacking, self-healing, and movement. Some are just focused on setting up a killer alpha strike, like the Bygone keyword, while others are trying to stack a beneficial condition, like the Wildfire keyword. Some, like the Pig keyword, have the option of building an engine during their unpack, while others, like the Kin keyword, just have a little bit of prep work to do.
There are certain similarities, however. No matter your crew, the goal of your unpack is putting you in a position to win the game from the first activation. You should keep your eyes on that prize.
At least 50% of that is simply how to move your models out from your deployment zone; there’s not a crew in the game that can win while milling around in your backfield, so you have to be thinking about positioning. There’s an aphorism in Malifaux: whoever takes more Walk actions loses. Part of your unpack should be thinking about how many things you can do that aren’t Walk actions, while still advancing your crew into position to score your Schemes and the Strategy.
The rest of your unpack, though, is going to be personal, and to a great extent, up to you. Some things won’t change: if you’re playing Jedza, Everlasting, you will want to put Life Tokens on her; if you’re playing either Rasputina, you will want to start setting up Ice Pillars. But two different players can unpack the same crew very differently, and you should identify those things that really matter to you. Is your gameplan to hose the enemy off the board with Fuhatsu? You should be thinking about how to stack Focus on him and push him up the table. Are you hoping to summon Daevas with English Ivan? You should be positioning Shadow Markers for him to jump to and draw line of sight through. Are you planning to stack a ton of burning on Kaeris, Reborn and then zorch someone with Scorching Radiance? You’re a bad person and I shouldn’t be helping you, but if you must, you should at least throw down a Pyre Marker as soon as possible to start lighting your Master on fire.
A Sample Unpack
At some point, I have to get into specifics. There are dozens of Masters in the game, and I can’t possibly describe every single type of unpack. However, I’ll show you an example, with a handy diagram, of what I mean.
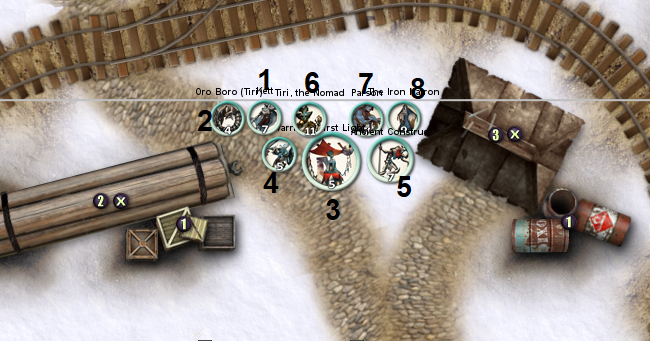
Here’s a sample deployment for a Tiri, the Nomad crew on Standard deployment. I would normally hire Jin Baccara instead of an Aua Warrior, but I wanted a model that I could physically display. I’ll go over the activations one at a time.
0. I will start the turn in Tradition mode. During the Start Phase, I will hand out Shielded: 2 on Tiri, 1 on the First Light, one on Kett (from the First Light), one in Parson, one on the Iron Matron (from Parson).
- Kett will activate first. I will use Alter Gravity twice, taking the built-in Safe Passage trigger both times. I have positioned my entire crew so that I can place a Shockwave Marker that catches all of them in its area of effect. The Safe Passage trigger pushes them all 3″, twice. I will mostly advance everyone straight forward, though the First Light will hang back slightly, and Parson and Tiri will part enough to leave space for the Ancient Construct to move between them. I want both of these to go off, so I will cheat if I have to; the crew has a ton of card draw, and Kett will draw a card from Tiri’s aura anyways. Kett will then use Follow My Path to push the Ancient Construct to advance it into that gap.
- Oro Boro will activate next. Oro Boro’s activation doesn’t actually matter; I am just skittering him up somewhere safe while he’s still Mv 7. Depending on my opponent’s crew and the scheme pool he will either Walk twice, Walk and Concentrate, or maybe even Walk and use Entomb if the deployment is very close.
- The First Light is next. She will begin with Consult the Ancestors. It is essential that this goes off, so I will cheat if I have to. I will look at the top 5, arrange the best card to be on top so that I can draw it with Tiri’s aura, then discard all the bad cards, making sure to leave a 5+ on top for my next action. The goal is to stack the lowest card that’s 5 or higher so that after I draw for Tiri’s aura, I will immediately flip it when I Radiant Flare. The purpose of this Flare is just to move the Iron Matron forward so that she is as far forward as she can get while still being within 1″ of the Ancient Construct. The First Light may then Focus, Walk if I feel really safe, or even Interact; she can drop a scheme marker beneath her and move it around with Drag Behind, so if I want to use it later for Leave Your Mark or similar scheme, I can.
- The Aua Warrior is next. He will attack Tiri with a Discus Grenade. I’ll push her up a bit with Force of Repulsion, but the real goal is to ping off one of her Shielded, so I can pass it to the Ancient Construct using Repurpose. I must make sure that I have LOS to both models! He’ll draw a card off of Tiri’s aura, of course. The Warrior can then Walk or, if it’s not safe to go up further right now, Focus.
- The Ancient Construct is next. Easiest activation in the world: it simply Tosses the Matron and Parson. The goal is to get the Matron as far forward as possible and Parson as far forward as is safe. Because I’m in Tradition mode and I previously gave my Ancient Construct Shielded, I get the As the Smoke Clears trigger, which will be a big help keeping the Matron and Parson safe. And I also draw a card from Tiri’s aura. If it’s really dangerous to stick Parson out there, I can Focus instead of Tossing him, and keep him in my Take the Hit bubble. I will also put up Auan Protector.
- Tiri is next. I’ve now done everything I need Tradition for, so I switch to Technology. My first step is to target the Iron Matron with Impassioned Defense, stacking more Shielded on her and giving her a Focus with the Preparations trigger (and drawing a card, natch). I will then cast Off the Path on her. If I have a 6+ of Crows, I’ll cheat that; otherwise, I’ll stone for the Crow. I have to get Burn Out. That’ll do no damage, but ping off a shield, and more importantly give the Matron Fast. It’ll also let me cycle the two worst cards in my hand (which are both probably pretty good, since I’ve been drawing so much) and push the Matron even further. I may also Off the Path Parson, if I have to in order to get him into position; otherwise, I’ll Off the Path the Ancient Construct. This time, it’s not essential for me to get Burn Out, but it sure is nice. The goal is to shift him up so he’s near Parson and the Matron. I can then Walk Tiri, making sure to end within 2″ of the Construct to keep her safe.
- Parson should be, at this point, at least reasonably far up the board. His only mandatory action is to use Remove Impurity on the Iron Matron for the Superheated trigger, potentially drawing a card from Tiri’s aura if the positioning works out alright (usually that won’t happen, but it depends on the board). My second priority is to get him into Take the Hit range so he doesn’t just get picked off. Often this will mean his turn is Walk – Remove Impurity – Walk, but that’s alright: he’s doing his job.
- Finally, the Matron. If I did everything right she should be some arbitrarily huge number of inches up the board, with Fast, Focused, Shielded, a permanent +twist to damage flips, and a hand full of Severes. She can use Last Matriarch on herself to slide into the DMs of whatever valuable model dared to step out of its deployment zone, building in the trigger for a free attack at double-positive-flips to damage. The rest is left as an exercise for the reader.
No plan survives first contact with the enemy, but this one is pretty solid. You have to learn what actions are potential threats to your unpack – what things you can safely ignore, and what things matter. You have to figure out what’s actually mandatory and what’s just nice to have. Once you understand those two principles, you will know how to alter your unpack on the fly in order to respond to changing conditions on the board. In this case, those alterations mostly revolve around how to keep my models safe, which usually means keeping them near the Ancient Construct.
Key Questions For the Discerning Unpacker
So, now you know what an unpack is. And you know what it’s meant to accomplish. But, unless you play Tiri, you don’t really know how to unpack your crew. The good news is: you can come up with it yourself! It’s always good to talk to other players, of course, and the helpful people on the Malifaux World Series and Play Wyrd discords should be able to help. But planning an unpack on your own will also build your understanding of your crew. If you want to take that step, here are the questions you should keep in mind to guide you along the way.
“What is my ideal end state?”
In other words – if you unpack perfectly, what happens? This could be something like “a juiced-up Iron Matron is in my opponent’s base, killing their dudes.” Or maybe “Kaeris is burning like the Mendocino National Forest.” Or even just as simple as “Ophelia has all her guns and every named Kin has a focus.” Defining your goals sets the tone for everything that happens next.
“Who do I hire to make this happen?”
Once you have your goals, you should start seeing what models are indispensable for achieving those goals. In the example above, I used Kett to push my entire crew 6″ forward during my first activation. However, if the deployment type is Wedge or Flank, I might not need to do that, and could spend those stones on someone else. If Ulix, Porkbelly Protector wants to start churning out War Pigs turn 1, he’ll need to hire Merris to set some fires; if that’s not his plan, he can leave her at home. Sometimes you’ll need to hire out of keyword to make part of your unpack work. Once you know what you’re trying to do, you’ll have a good idea of who can make that happen.
There are a few models that show up frequently as unpack all-stars. Bo Peep, for example, pushes your entire crew up 3″ with The Race Is On; Harrison Frodsham and his Watchmen can push your models around with A Cog In Its Place and hand out Focus with Isochronism; Kunoichi can hand out Focus with Galvanize and stack your hand with Tools for the Job. Other models can help specific crews with their unpack: the Hodgepodge Emissary’s Weary Road generates Scheme Markers for Parker’s models to eat with Life of Crime, while Daydreams’ Lead Nightmare grants out of activation movement to Nightmare models. The key is finding which models work for your crew and your plan. You’re also stuck with whoever you hire for the whole game, so I’d avoid hiring models that become useless after Turn 1 – unless your entire game plan hinges on their Turn 1 activation.
“How does the deployment zone affect my unpack?”
There are two parts to this question: first, how does the deployment type affect the unpack; second, how does your specific deployment zone, and the terrain within it, change things.
Remember that you know your deployment zone before you event declare a Master. As noted above, you can forego hiring Kett on particularly close deployments. But if you’re playing Wizz-Bang, a crew that really wants to cluster up its models at the start of the game so Bo Peep can run roughshod over them to activate Hard Knock Life, then you need a deployment zone with enough space to pack them all in. If your deployment zone is blocked and broken up by rocks and buildings, you may need to spread your crew out more, and so you may not be able to achieve that initial burst of speed and self-damage provided by The Race Is On.
Your deployment zone can affect both what you can possibly hope to achieve (i.e. it’s a lot harder to get everyone up past the centerline turn 1 on Corner deployment) and how easy it will be to achieve your goals.
“How does my hand affect my unpack?”
You don’t see your hand until you’ve fully deployed, so the cake is kind of baked at that point, but it’s still a relevant consideration. Many unpacks involve successfully hitting certain TNs, or successfully resolving certain triggers; to continue my examples from above, Kett’s shockwaves and Bo Peep’s The Race Is On both have TNs, and Wong really wants to hit the Protective Glow trigger. Once you see your hand you will know how realistic it is that you will be able to hit all of your TNs and triggers.
You may have to stone for cards turn 1 if your hand really can’t support your plan. Or you may have to plan to spend soulstones for suits. In extreme cases, you may forego parts of your unpack if you can’t guarantee them. You should also spend some time thinking about how the Black Joker can screw you over; actions like Ride With Me and On the Pyre are both critical to their respective crews’ strategies, and Black Jokering either can radically alter the way your turn plays out.
“What schemes am I trying to score?”
This is something you should always be thinking of, but it’s especially important when you have multiple ways to unpack your crew. If you have two possible plans for turn 1 – a full-out advance and a more measured one – you may choose which to pursue based on the scheme pool. If you’re looking to score Vendetta and Leave Your Mark, you can move more slowly, but if you want to score Sabotage and Breakthrough you may need to just burn rubber. Think about where you want your models to be and what condition they need to be in in order to start scoring on Turn 2.
“How could my unpack be disrupted?”
Unfortunately, as much as we wish it were otherwise, your opponent does have models and can take actions with them. It’s dreadfully unfair, I know, but until Wyrd fixes it there’s not much we can do. So you need to know what types of things your opponent could do to mess with your beautiful plan: Judd & Honey can reach out into the opponent’s deployment zone on Turn 1 and spread damage and Staggered. The Undercover Reporter and Jin Baccara can send minions back to their controller’s deployment zone at any time. Zoraida, Swamp Hag’s Seal Fate can badly screw up your activation order. Maybe you can’t stop these things, but if you’re aware of them, you can plan for them: save cards to pass the Massive Net TN against Judd & Honey, or hold off key minion activations until the Undercover Reporter has activated.
And this goes in the other direction as well: as you become familiar with other crews’ unpacks, you can disrupt them yourself. If Brewmaster, Moonshiner is planning to have his whole crew sit in the Whiskey Golem’s aura of Hazardous: Poison +1, you can use Pandora, Tyrant Torn’s No Shelter Here to give it an aura of Hazardous: Damage 1. Now they have to either take a shitload of damage on their crew, or move the Golem away and lose the benefits it provides.
“What absolutely has to happen and what doesn’t matter as much?”
As noted above, sometimes your hand constricts you. Moreover, sometimes your opponent constricts you. You need to be aware of these constraints and determine which steps you can afford to skip (or at least perform suboptimally) and which ones absolutely have to happen in order for your plan to work. If your opponent can kick your minion back to your deployment zone, maybe that’s fine, if you don’t need that minion in position for your plan to work. If it’s a Mounted Guard, once you’ve used Ride With Me to give Dashel Barker, Butcher a lift, it’s not the end of the world for the Guard to be sent to time-out. But if you’re moving a Guilty forward to act as a hookshot target for Jack Daw, Ensouled’s On Your Heels, and your opponent can push that Guilty away with Heavy Salvo or Terrorize, then suddenly your plan falls apart. In such cases, building in redundancy (hire a second Guilty!) might be the trick, or you can just delay that portion of your unpack until the models that can disrupt it have already activated.
If you can’t guarantee successful performance of a “mandatory” step, you may wish to consider a different unpack, or at least have a backup plan. The Tiri Turn 1 listed above goes to hell if Zoraida forces the Iron Matron to activate early, so against Zoraida, maybe you accept that you might not get to alpha strike until Turn 2.
“Where do I go from here?”
You won’t win the game Turn 1. Trust me, I’ve tried. The best you can do is put yourself in the driver’s seat. That’s still great – Malifaux is a game where momentum really helps you – but you need to know what comes next. Say you successfully manage to get your whole crew into position, loaded with beneficial conditions, and with a lovely stacked hand. Or say you managed to isolate and destroy a key piece on Turn 1. Awesome! So what do you do next?
People come from behind to win in Malifaux all the time, and usually that’s because their opponent, having accomplished an early goal, lost momentum and dithered. You have to know what a good turn 2 looks like in order to really understand what a good turn 1 looks like. Say you’ve managed to get your Bandit models into position, loaded with Focus and Trinket upgrades and with Scheme Markers positioned to give them Fast. Turn 2, who activates first? Are you chain activating with Memento? Who are you targeting with those early attacks? Or say you’ve managed to push Fuhatsu forward and shoot a pesky Executioner off the board before he could get his claws into you. Who’s next? Is Fuhatsu in danger? How are you going to keep him safe?
Most of all, how do you accomplish your Schemes and score the Strategy from here? You can’t score Turn 1, so you only have to worry about setting yourself up for success. Part of the the unpack, then, is putting yourself in a position not just to take the fight to your opponent, but to start scoring ASAP.
Hopefully this is helpful! Unpacking properly is a hugely important skill, and one that will stand you in good stead throughout your Malifaux career. It’s also something you can practice, even on your own. Once you’ve got your unpack down to a science, it becomes second nature, and you can pay more attention to your opponent’s actions and how to capitalize on their mistakes. There’s always more to learn, though, and there’s no one right way to unpack any crew, so experiment and figure out what works best for you!
Have any questions or feedback? Drop us a note in the comments below or email us at contact@goonhammer.com.
