In our How to Paint Everything series, we take a look at different armies of the Warhammer universe, examine their history and heraldry, and look at several different methods for painting them. This week, we’re looking at the most wonderfully putrid Space Marines of all, the Death Guard.
The Death Guard
The Death Guard are a traitor legion who worship and act in service to the Chaos God Nurgle, the god of plagues and pestilence. Originally the XIVth legion of the First Founding, the Death Guard fought in the Great Crusade under their Primarch, Mortarion. They can trace their origins in the game and their rules all the way back to the first edition of Warhammer 40,000. They first received rules, and their primarch was named, in the Realm of Chaos: The Lost and the Damned supplement, which covered armies dedicated to Nurgle and Tzeentch. Since that time, the Death Guard have had faction rules that were broadly defined through the use of Plague Marines, the Mark of Nurgle, and Chaos Daemons, though like the other Chaos Legions they received formal faction rules during 3rd and 4th edition after the release of their Index Astartes article. The faction lost specialized rules in 5th edition but received new ones in the Traitor Legions supplement at the tail end of 7th edition.
As an Imperial legion, the Death Guard were known for their tenacity and toughness. They took after their Primarch, Mortarion, who grew up and was discovered on the harsh world of Barbaros, an industrial planet covered in toxic smog and ruled by brutal warlords. Mortarion was raised by one of these warlords, but would eventually betray his adoptive father by becoming a warrior for the planet’s oppressed peoples. When the Emperor arrived on Barbaros, Mortarion was locked in a battle with the planet’s last surviving warlord – the same warlord who had raised him and taught him the arts of war. When Mortarion succumbed to the planet’s toxic atmosphere trying to scale the warlord’s tower, the Emperor stepped in and finished the job, and Mortarion pledged his services to the Great Crusade, though he never forgave the Emperor for denying him the opportunity to slay the Tyrant of Barbaros. Mortarion had always felt more comfortable around Horus than most of his other brothers or the Emperor, and when the Warmaster announced his rebellion, it didn’t take much to convince Mortarion to join his cause. The conversion of the Death Guard was further aided by Calas Typhon (who would later become Typhus), the Captain of the Death Guard’s First Company. He had long been a follower of Chaos and led the Death Guard’s fleet into the warp, where it became stranded and beset by plagues sent by Nurgle. These strange diseases ravaged their numbers until finally Mortarion cried out for aid, and was met by Nurgle. The legion was transformed, becoming bloated and vile. Typhus was transformed, becoming a living host for the Destroyer Plague that had ravaged the Death Guard. And Mortarion emerged as a champion of Nurgle.
With the release of 8th edition, Death Guard moved into the spotlight, taking a central role in the return of Roboute Guilliman as Mortarion’s forces attacked the Konor system, destroying valuable worlds and corrupting whole populations and destroying food sources. The Death Guard received their own Codex for the first time, featuring unique units and rules and rules for Mortarion, the second Daemon Primarch to receive a model. In the fiction, Mortarion clashed with the reawakened Roboute Guilliman, fighting him to a standstill on Iax before withdrawing with his fellow Death Guard and virus bombing the planet. When 8th edition released, Death Guard received a feature role as the main villains of the edition, showing up as the enemy force in the Dark Imperium box set, and getting their own standalone codex as the second release of the edition’s Codexes. They also got an entirely new plastic range that saw the release of the third plastic primarch model, Mortarion.
Where to Read More
You should start with the content in Codex: Death Guard, but after that there are a few different places to read about the Death Guard:
- Dark Imperium and its follow-up novel, Plague War, both cover Roboute Guilliman’s return to the Imperium in the 41st millennium and the resulting campaign that rages across the Konor system. The second book focuses more heavily on the battle against the Death Guard, but Mortarion and Typhus both figure into Dark Imperium.
- Mortarion doesn’t have his own novel yet in the Horus Heresy series, but there are a few books that prominently feature the Death Guard. Lantern’s Light is the closest thing you can get to an origin story, detailing Mortarion’s relationship with the Emperor one year into his joining the Imperium and taking the helm of the Death Guard.
- Horus Heresy Book 54: The Buried Dagger details the transformation of the Death Guard from a legion of superhuman warriors into a pox-riddled horde of Nurgle-worshipping monsters.
- The Lords of Silence is the first book focusing primarily on Death Guard as protagonists that takes place in the “modern day” Imperium. It follows The Lords of Silence, a Death Guard warband of about 600 traitor legionnaires devoted to Nurgle.
- Daemonology covers some of Mortarion’s first steps down the path of Chaos, following his defeat at the hands of Jaghatai Khan in the White Scars novel.
Painting Death Guard
Death Guard are fun as hell to paint, primarily because they are just an incredibly sloppy, gross army. In many ways, they’re one of the most forgiving armies a newbie can paint, because the models welcome a lot of splatter and messiness. On the other hand, it can be really easy to overdo it with effects and grime and come out with something that looks muddled and overdone. The best Death Guard armies know when and where to apply color and grime, and strike a good balance with other colors. Death Guard also create a lot of opportunities to really use the Games Workshop technical paints, and several of the techniques we’ll dive into below make good use of these.
Robert “TheChirurgeon” Jones
I loved the new Death Guard minis the moment I first saw them in blurry, leaked preview images six months before 8th edition launched. They’re a wonderful blend of gross, grimy, grim, and goofy that appeals to me. While I like the crisp white look inspired by the Heresy-era Guard, I’ve always been a fan of the 2nd edition color schemes for Chaos armies, and so I knew I wanted to do mine more of the traditional green. I also really liked the studio’s scheme for incorporating purples into the cloth effects, so I went with that too. Finally I use a lot of technical paints on these guys — Nihilakh Oxide, Typhus Corrosion, Blood for the Blood God, and Nurgle’s Rot all see regular use when I’m painting Death Guard.
My basic method is pretty similar to the method showcased in White Dwarf.
Prime: Black
Armor
- Basecoat with Castellan Green, Wash with Nuln Oil. Then I do a layer of Castellan Green on the raised parts over that, and then I go over that with Death World Forest and hit the topmost areas/edges with Death Guard Green. They’re edge highlighted with Ogryn Camo.
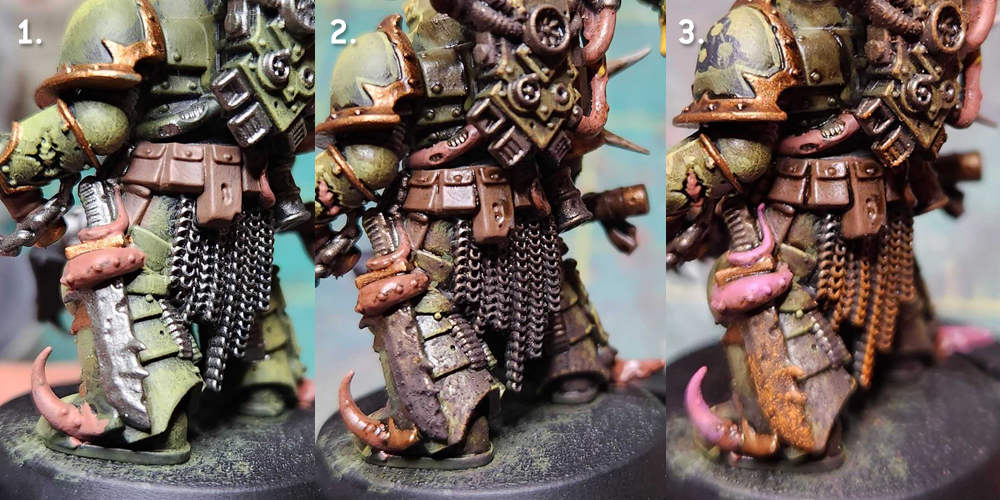
- After I do the basecoat, I’ll go back over some of the recesses and lower parts of the model and hit those with Agrax Earthsahde. I’m pretty liberal with this, and trying to paint oil spots/drips/leaks.Then I hit patches of it with Typhus Corrosion.
- The Gold Trim and Bronze Parts are Balthasar Gold washed heavily with Agrax Earthshade.Then I hit it with Nhilakh Oxide to give it that oxidated look. For the armor trim, I’ll edge highlight or hit parts of it with Retributor Armor.
- Chainmail and other Steel parts are done by basecoating with Leadbelcher, then I wash with Nuln Oil and Agrax Earthshade, then edge highlight with Ironbreaker. If I want them to look real rusted, I hit them with Typhus Corrosion and then drybrush that with Ryza Rust to make it look old and rusted over.
- Snot is painted Death Guard green, then covered in Nurgle’s Rot
Bone: Basecoat Rakarth Flesh, then wash with Agrax Earthshade. Re-paint with Rakarth Flesh, then edge highlight with Reaper Polished Bone.
Fleshy Bits:
- Basecoat with Bugman’s Glow
- Wash with Agrax Earthshade
- Re-coat with Bugman’s Glow. Edge highlight with a 50/50 mix of Bugman’s Glow and Reaper Polished Bone
- Boils are done with Averland Sunset
- Coat with Nurgle’s Rot
Plague Weapons: Basecoat with Leadbelcher, wash with Nuln Oil and Agrax Earthshade. Hit with splotches of Typhus Corrosion. Edge with Ironbreaker. Coat in Nurgle’s Rot. Cloth: Basecoat with Naggaroth Nightshade. Wash with Nuln Oil. Re-coat with Naggaroth Nightshade. Shade up with a Mix of Naggaroth Nightshade and white. Edge highlight with Genestealer Purple. Smoke: Basecoat with Reaper Ghost White, then wash with a mix of Coelia Greenshade and Drakenhof Nightshade Viscera: Basecoat with Bugman’s Glow, then coat with Blood for the Blood God. Re-coat with Nurgle’s Rot.
Bonus: Painting Poxwalkers
For Poxwalkers, I tend to start with a flesh tone base (Rakarth Flesh, Bugman’s Glow, Cadian Fleshtone, Kislev Flesh), then I wash them with various colors, based on what I want to do with them color-wise. Washing flesh tones with Carroburg Crimson, Duruchii Violet, Coelia Greenshade, Cassandora Yellow, and Biel-Tan Green all produce interesting results, and I’ll usually combine them on a single model to get interesting effects. I then do the largest boils with Averland Sunset, and I hit most of the green parts of the model (and then some) with Nurgle’s Rot, to give it a shiny, snot-covered look.
Daniel “Zuul the Cat”
I had been reading a bunch on the background of Warhammer 30,000 and came to the realization that Chaos was, in fact, right. I was originally drawn to Death Guard because I felt the models really captured what Chaos Space Marines were supposed to look like – warriors that had existed for 10,000 years in the warp. I never gave them much thought prior to the new models because they just looked like regular Space Marines but with spikes on them.
The Armor: You want to start by spraying the entire model Death Guard Green, then picking out any of the pockmarks on the armor or deep gouges with Screamer Pink. Following this, wash the entire model with Agrax Earthshade, taking care to not let it pool too much (although a little bit is fine). Once that dries, a 2-step downward stroke drybrush is done with Elysian Green followed by Ogryn Camo for the armor. You can also highlight the pockmarks with Pink Horror and Emperor’s Children. The Metallics: The trim of the armor is picked out with Balthasar Gold, while any metal bits (plague knives, boltguns, armor decoration) is Lead Belcher. For any ornaments on the armor, such as the bells or censers, I used Screaming Bell to give it a different tone than the armor trim. These are all then washed with a 1:1 mix of Nuln Oil and Agrax Earthshade. Using a thinned down mix of Nihilakh Oxide with water, you can then apply it as a wash to the gold trim and ornaments. It’s okay if it looks heavy when it goes on, it’ll flatten out in the recesses. Beyond this, your metallics are done. I don’t think Death Guard look right if they’re highlighted. They should look grimy and dirty, as Grandfather Nurgle likes. The Details
- For the smoke from the censer on top, base coat with Celestra Grey followed by a highlight of Ulthuan Grey. Wash with Coelia Greenshade and pick out the highest points with Ulthuan Grey once again.
- For the shoulder pads, basecoat them with Ushabti Bone and wash with Seraphim Sepia. For the red markings, basecoat with Mephiston Red and highlight with Evil Sunz Scarlet.
- For any ooze or the veins in plague knives, basecoat with Caliban Green followed by a highlight of Warp Lightning. Wash with Biel-Tan Green and finish with a final highlight of Moot Green.
- For tentacles, I simply paint these Screamer Pink on the tops and Thousand Sons Blue on the bottom, also adding a few Temple Guard Blue dots for depth.
- For flesh tubes (lol), base them in Screamer Pink followed with a layer of Pink Horror. Wash the area with Carroburg Crimson. Once dry, layer once again with Pink Horror but leave the recesses dark. Layer up from there with Emperor’s Children, Ushabti Bone and Kislev Flesh. Add a little thinned down Druchii Violet around openings to make the flesh look bruised. I got this recipe from someone online and I can’t remember their name.
- To make the model look dirty, I use AK Interactive Streaking Grime for, well, the streaks of grime. It’s an oil paint, so you can thin it down later if you want with mineral spirits/white spirits. I left mine a little stark here so it’s easy to see from the table top.
- Lastly, for the eyes, it’s a simple Averland Sunset base with an Yriel Yellow highlight. This is then glazed over with Lamenter’s Yellow.
Macathu’s Bog Death Guard
Greetings fellow disciples of Papa Nurgle! In this tutorial, you will see how my squad of Blightlord Terminators emerged from the muck and onto the battlefield. This was the first set of terminator models added to my army, so I wanted to experiment a bit and make them differ slightly from the rest of my models. The two standout components wound up being the utilization of multiple texture paints and some OSL (which was honestly a happy mistake).
To start things off, the first phase will be priming followed by zenithal underpainting. I prime my models with “ultra flat” black to aid in shadows and take care of any hard to reach spots later on. I’m not really picky and will use Krylon or Rustoleum rattlecans from a hardware store. In the instance of those brands, the “camouflage” lines in particular. Neither of them are actually primer, but are formulated to adhere to plastic. Supposedly the Krylon line is better, but I haven’t had any issues with the Rustoleum. The next three coats will use a selection of greys and “Matt” white from Army Painter.
I’m a big proponent of that dirty filthy casual technique of dry brushing and in this case, I will be using some makeup brushes to apply the layers. If you haven’t tried them out yet, I highly recommend it. They are super cheap (I think I paid $7 shipped for an assortment of 10 or 12) and the extra soft bristles help accomplish the job with ease. The rounded tip ones seem to work best for ease of access on a model. The only downside is that they can be a bit paint thirsty, but that’s a minor complaint.
I used the larger brush for 90% of the dry brush work and will note when I switch over to the smaller one. For the more detailed work I used a normal hobby brushes, sizes ranging from 1 to 5. Here is the dry brushing progression – you will notice that as the color being applied gets lighter, I attempt to stop a littler higher on the model with it: Field Grey:
Ash Grey:
Matt White:
Now why spend all that time underpainting? Well, my little bubo, I’m glad you asked! The first reason is pretty obvious – it gives you a great idea of how the shadows are naturally going to fall and where you should focus your efforts or do “just enough” for each section of the model. Sure, you should try to paint all of the surfaces, but if it will never be an eye focal point there’s no reason to go overboard with it. The second reason isn’t as obvious – your models will look freakin’ bad ass! I’m sure many of you have hit that wall where you don’t want to finish a painting project because the model “looks like garbage” until the final stages. This helps to circumvent that and provides a nice boost of motivation to help carry you forward (as you go through the progression pictures, you can see that there really isn’t a stage where they look “bad”). In the next phase of actually applying color, we will start with Venom Wyrm green for the shoulders, shins, helmets and gloves. Even when I was still using the GW green I went for Deathworld Forest instead of Death Guard green. It is slightly lighter which helps compensate when a wash is applied.
One of the major issues I’ve had in this aspect of the hobby, is winding up with models that are just way too dark at the end. To combat this, I’ve gradually adjusted my paint schemes. In wanting to keep the models a little on the lighter side, I leaned towards the 30k scheme instead of just hitting the whole model with green. Duncan be thy name, two thin coats shall be done.
There are two out of production paints that I used for this project and here is the first. The bloaty and grabby bits will pulse with Liche Purple (according to the conversion charts I found, its now called Xereus Purple from the current GW line).
These pots were brought back to life with the nectar of Nurgle!…..water…it was just water. At this point, it’s so diluted that it resembles a heavy glaze more than regular paint (the pot is full of air bubbles after shaking it up). I’m still adding a few brush tip fulls of water to the solution, but I do indeed blaspheme with only one coat.
At this point, technically I’m done applying the main colors and I’m on to the details/accessories stage – weapons, capes, chain mail, etc. I will be using GW’s Snakebite Leather contrast paint for weapon handles and wraps. Boltgun and Balthasar Gold for the metallics.
The goal for the metallics is a nice bronze color, post wash. All of it will start with a dry brush of Boltgun to provide a reflective base. The locations with full coverage of the Balthasar will be part of the pauldrons, some tubing, and some trim here and there. The rest will be more of a highlight with, you guessed it…dry brushing!
In addition to getting the eyes, the last part of the “details” phase (even though the surface area is a decent size) will be the cape that some of the models have. I will be using the highly specific and rare color, “RED.” No joke, that’s what its called in the instructions included in this paint set (Editor’s Note: It’s Mephiston Red). To blow your mind even more, I received this kit years ago for FREE….from a coupon I cut out of a weekly shopper (look it up, kids). For this step we will again be performing the ritual of two thin coats.
The next phase will be very simple but very time consuming – using the texture and slime paints. Martian Ironearth and Armageddon Dunes will compose the base of the “bog” look – Ironearth for the crackle and Dunes for the gritty mud.
One of the lessons I learned the hard-way about crackle paint is that if you don’t pre-paint the base, you will wind up using a ton of wash to try and cover up the primed base showing through (Editor’s Note: Can confirm. I also learned this the hard way). Using just a very light coat of the crackle paint is fine – with it this thin, it acts just like regular paint.
Applying this light coat is also where you will map out the regular application of the texture paints. Since it was a group of five, one model has the muck up to the chest, two are angled and high up on one leg and the last two are up to knee level. The texture paints usually never sit the same way twice, but this will ensure some extra variance.
If you’ve never used the crackle paint before, the thicker it’s applied the larger the cracked sections will be. This may sound good at first, but also know that the larger the sections, the more likely it is to flake off when you paint anything on top of it. In this closeup, you can see what I’m talking about with the larger flakes and being able to see the base underneath.
You can use your imagination here and make the model more dynamic – pile it up in front of the feet, less underneath the heel, etc. This paint does take a very long time to dry, so its common for me to just let it dry overnight. If not that, apply it first thing in the morning so you can work on it in the evening. If you are trying to keep the production line moving, the first thing in the morning scenario is probably best, since you will have to wait for the Armageddon Dunes to dry as well. This layer is going to be applied on the lighter side.
Going too heavy will cover up the crackle and leaving some red exposed helps add to the effect. Once dry, its time to accent the model with either GW Nurgle’s Rot or in my case AP Disgusting Slime. More or less the same thing, but the dropper bottle helps keep the paint mixture fresh. The go-to spots for the slime are weapon edges/barrels (they are plague weapons after all), exhaust ports, gaping wounds, and the base of horn growths. Besides that its really all to…uh….taste.
Be forewarned, it’s very easy to go overboard with the slime (Editor’s Note: Strongly disagree) – too much and all of the time you spent on those details is for naught. After the slime coagulates, its bath time for this dirty boi! I used to use the GW Sepia wash, but once again prefer the dropper bottle of AP Soft Tone. In theory, everything is dry when you apply the wash, but there is no way to avoid your brush grabbing crumbly bits of the Armageddon Dunes. If you use a wash with the GW style pot, its only a matter of time before you contaminate it.
The wash step is one of those magical moments that helps bring everything together and gives you a good idea of the finished product. Soft Tone helps Balthasar Gold take on more of a bronze shade and the untouched underpainted sections turn that nice and dirty off-white color. I know people usually go for Nuln Oil or Agrax Earthshade, but I feel like Sepia/Soft Tone still shades well enough without making the model too dark.
The, “Finishing Stage,” is comprised of steps focused on bringing up the highlights and finally adding some OSL (Object Source Lighting) at the end. From here on out, the small makeup brush will be used. Since these stinky bois were washed down in the previous phase, its time to bring those edges back to the forefront.
The models will be dry brushed again with the Ash Grey, but very lightly this time around. The purpose of the grey is to provide a base for the Scorpion Green that will be applied next. This will separate the green from the model slightly and help keep the brightness up.
This is the second out of production paint that was mentioned earlier. And just like the other one, this pot needed a resurrection, so it’s heavily watered down. Supposedly, GW’s modern equivalent is Moot Green and the AP equivalent is Reptile Scales. That said, neither of the online images seem as neon as the OG. I’ll have to do some research, but when I run out, I may have to experiment with placing it on top of a layer of yellow to get the desired result.
I approached it from a zenithal perspective, while layering it on heavier for weapon blade edges and the front of gun barrels. This grey and green layer work is actually in prep for more layers later on. The next step will be brushing on some AP Anti-Shine Matt Varnish. This product serves multiple purposes. The entire model will be hit with it like a wash and as advertised it will bring the shine level down a bit. This helps push the grime level a bit and makes the metals not as jarring compared to the rest of the model. It also helps cement the texture paint in place. Note: don’t worry about bubbles too much as you brush this on, they will go away as it dries.
Since we intentionally brought the overall brightness level down, it’s time to Reset the Clock!TM and dry brush highlight all over again! This time around we will be using the Matt White instead of grey. Again, with the zenithal focus.
Don’t feel like using the varnish is causing extra work – quite the opposite. Depending on how heavy the earlier layer of Scorpion Green was, we should have a nice gradient going on once the fresh layer is dry brushed on top of the white. Once that layer of green dries, we will be using it for the OSL work as well. Instead of dry brushing, we will be “damp brushing,” for lack of a better term. You won’t be picking up as much paint as a regular brush, but the makeup brush will definitely not be in the “dry brush” state. Lightly dab it into your paint supply and give it just enough swirls on a paper towel to spread the paint around and soak it up a little bit. After that, revert back to the dry brushing technique of only traveling in one direction with your strokes and go to town. Something that helped me immensely was flipping the model upside-down during this process. It helped to get a unique perspective and see how light would actually interact with it. In addition, always remember that you are trying to work from a particular focal point (or weapon edge) and work on the heaviest paint coverage being as close to that point as possible.
After you are happy with the OSL step, just touch up the eyes with a fresh coat of red, paint the base rim black (I run a hard edge around it to remove any texture paint spillover first) and you are done! One last comment about the OSL – even if you’ve never done it before, go for it! This was my first real foray into it and it was a lot easier than I thought it would be. After going a bit too heavy during the last Scorpion Green dry brush, I decided to commit and see what happened. I hope this tutorial helps a few of you budding nurglings out there or at the least gives inspiration for some color choices. -Papa Praise!
RichyP
Step 0 Prime Death Guard Green Step 1 Paint gold areas in Balthazar gold Paint Silver areas in VMA Steel Paint fur in Zandri Dust Paint pink/fleshy areas in Tuskagor fur Step 2 Wash entire model in Agrax Earthshade Step 3 Highlight green areas in Nurgling Green. Paint lots of little lines at the edges of the armour plates all going vertically along the armour in Nurgling green too. Drybrush the steel and the gold in Silver. Drybrush fur in Rakarth Flesh Step 4 Smaller highlights of Krieg Khaki inside the Nurgling Green bits. Apply some Rhinox Hide to a dry brush and liberally stab the metals to get a rust effect. Step 5 Repeat the rust areas with a small amount of Troll Slayer Orange to finish it off. For the blue glowing effect I used on these guys check out HTPE: Quick and Easy OSL
Charlie A.
I like Death Guard because of their resiliency and Nurgle was my first foray into Chaos. I wanted my Death Guard models to be striking, and for my opponent to walk up from the other side of the table and think they looked cool. To that point, I wanted the models to look good from 1-3 feet away, choosing to focus on a couple of visually interesting elements (the rust and weathering) instead of every detail and facet of the model. I like this approach in general. The weathering approach I used, combined with the classic 30k color scheme, resulted in a starkly contrasting model, which is interesting to look at.
For the body and dozer blade:
- Prime black.
- Base the whole model is a very dark brown (Model Air burnt lumber). This is the darkest part of the rust that will eventually shine through.
- Pick a lighter brown (I used Mournfang Brown) to serve as a highlight to the rust color and do a rough zenithal highlight. Quick and dirty, don’t spend too much time on this because we’re about to cover it all up.
- If you really want to, pick a bright orange and pick out the most raised areas. Real rust is surprisingly orange so don’t afraid to use a Trollslayer Orange or an equivalent. Look up reference pictures if you need to.
- Varnish with your varnish of choice. I like Testors because it’s in a can and easy.
- Spray with a cheap hairspray all over, the cheaper the better. The key is that it’s water-soluble, which cheap hairspray is.
- Paint a light beige/cream color (p3 menoth white) all over the parts that will be the “white” color.
- Zenithal highlight with a whiter-cream color (menoth white highlight), picking out the raised or interesting areas.
- For the green parts, base in a p3 traitor green, then highlight towards the top with an Elysian Green.
- Take a toothbrush, wire pipe cleaner, or another tool with bristles or points, dip it in water, and gently scrape off some paint where you think the paint would naturally wear off. Start off slow and build the effect as desired.
- To pump up the contrast (which almost always results in a more interesting-looking model) take a dark brown ink, I used Daler Rowney Burnt Umber, and spray towards the bottom of the dozer as well as in some of the recessed areas.
For the metals:
- Base the bronze areas in Castellax Bronze then highlight with Molten Bronze from P3.
- Base the steel areas in Metal Color Burnt Iron, then drybrush a midtone of leadbelcher, followed by a drybrush highlight of Metal Color duraluminum.
- I used an oil wash (purple, black, and sienna) over the metal parts. You don’t have to; a standard acrylic wash is almost as good, much faster, and able to be controlled if you’re careful. The topic of an oil wash is probably worth an entire post, so I won’t go into the details here.
- I diluted Dry Rust from The Army Painter and did a thin wash in the recesses and pox marks of all the steel. Likewise, I diluted nihilakh oxide and did a thin was for all of the copper.
There’s a lot more detail on this model than I painted, but that’s an awesome part about painting your models with a couple of striking and visually interesting components – you don’t have to paint every detail because 95% of people won’t notice or care. Spend time on the biggest points of interest and you can save time elsewhere.
Raf Cordero
I was drawn to Death Guard after reading Dark Imperium by Guy Hayley. The creeping body horror and slow inexorable decay of a couple characters was compelling enough to make me want to paint up some Plague Marines. When the Plagueburst Crawler was released, I knew I needed to tackle this monster. I wanted to make the armor look like it was actively bleeding; an unholy merging of mechanical plates and flesh.
For the Body and Dozer Blade
- Prime grey
- Base the whole model in Flayed One Flesh
- Liberally wash the whole model with Athonian Camoshade. Use an extra brush damped only with water to pool, smear, and clear away the shade in patchy patterns.This color is intended to create a sickly, patchy, look and not necessarily wash into the recesses .
- Wash recesses and ridges with Agrax Earthshade. Use that extra water brush to blend and clear the shade away as needed. Letting it pool under the ridges helps the highlight stand out.
- Edge highlight ridges and armor panels with Flayed One Flesh
For the Wounds
- Stipple purple, brown, and yellow around all open wounds
- Glaze flayed one flesh the stippling to blend it back into the flesh
- Paint Blood for the Blood God into the wounds, dripping down as desired.
- While Blood for the Blood God is still wet, dab Nurgle’s Rot into the wounds. The two technical paints will mix incompletely, creating a bloody pus effect
For the Metals
- Silver metals are Leadbelcher and Nuln Oil
- Copper metals are Reaper Tarnished Copper, Stone Wash, and edge highlighted with New Copper
Death Guard really provides the opportunity to mess with technical paints. I also added Nurgle’s Rot to the mortars, treads, and recesses. Blood for the Blood God can come out of any part of the model to help drive home the unholy marriage of flesh and machine.
That Gobbo’s White Death Guard
The Death Guard weren’t always green – back during the Horus Heresy they wore white armor, though as grim warriors unconcerned with appearances it would often be chipped or covered in the dirt of battle. When the legion was stilled in the warp and became corrupted by Nurgle’s Destroyer Plague, the armor of the Death Guard became tainted and stained with unnatural corrosion. Though most now wear armor colored sickly green and trimmed with verdigris brass, some still wear the stained white of the original legion as a mockery of their Imperial past.
For these Death Guard I went in with the basic scheme of the Horus Heresy Death Guard of white, green, and bronze, but with an added splash of color for the various liquids, nurglings, and little creatures. I went into these miniatures wanting to leverage a lot of drybrush stippling for texture.
The white armor was started with a black primer and then I drybrush stippled the armor up to white using Vallejo London Grey, Vallejo Dark Sea Grey, and Vallejo Silver Grey. While doing this I try to keep in mind where I want the eye to go and where the most light would fall on the armor, those areas should be brighter. Lastly I stipple a very little bit of Vallejo White as a final highlight for the helmet and top of the chestplate for contrast. From here the armor is pretty neutral from black to white so I stipple Vallejo Dark Sea Blue in the darkest recesses to add some cool tones. Similarly I use Scale75 Brown Leather to add rust for warm tones and more visual interest.
This was all done using cheap makeup brushes which you should be able to find in any grocery store or you can get a big pack on Amazon. Drybrush stippling is easy to do and layering it provides some blending as well as texture to the armor.
I wanted to experiment with adding some micro details with chipping and battle damage so I used the smallest brush I had (3/0) and used pure black to create various holes and cracks, some of which extended the already broken armor of the Plague Marine. I then used pure white to highlight these lines and holes, this helps to make them stand out.
From here it’s a lot less interesting. The bronze was done using a basecoat of Scale75 Viking Gold, washed with Agrax Earthshade, and highlighted with Scale75 Dwarven Gold. I added some verdigris later on to add more color contrast and visual interest with Nihilakh Oxide, I made sure to thin it down a bit and layer it to have better control and not have the effect be overwhelming.
The green of the pauldrons is Scale75 Andrennes Green and drybrushed up with Scale75 Sherwood Green. The nurglings used the same recipe for my goblins: Scale75 Irati Green, Vallejo Escorpena Green, and Livery Green with a dark green wash. The pink goop is Scale75 Fuschia and highlighted by mixing in white. The plague knife used a similar process to the armor of drybrush stippling up from black with orange-browns and finishing off with a light drybrush of Vallejo Mecha Steel.
These were a lot of fun to paint and focus on doing the best painting I could at the time. I love how they turned out with the relatively neutral Plague Marine surrounded by bright colorful nurglings and little gribblies, the Space Marine Heroes Plague Marines were excellent sculpts for this.
Grandfather’s Lessons Learned
That should give you everything you need to start painting your own Death Guard army. The key is to just have fun with it, and experiment with techniques to make your models look gross as hell. If you have any questions about the methods here, or you’d like to share some models and methods of your own, shoot us a comment in the comments section below or send us an email at contact@goonhammer.com. We love to get feedback from readers, and if you’ve got a Death Guard army of your own you’d like to showcase in one of our Army Showcase articles, feel free to tell us that too — we’re always looking for new armies to showcase. We’re currently missing a recipe/method for more white-armored Death Guard, so if you’d like to share your army and recipe for the article, let us know, and we’d be happy to add it.