This article is part of a larger series on how to paint the Death Guard. To return to the parent article, click this link.
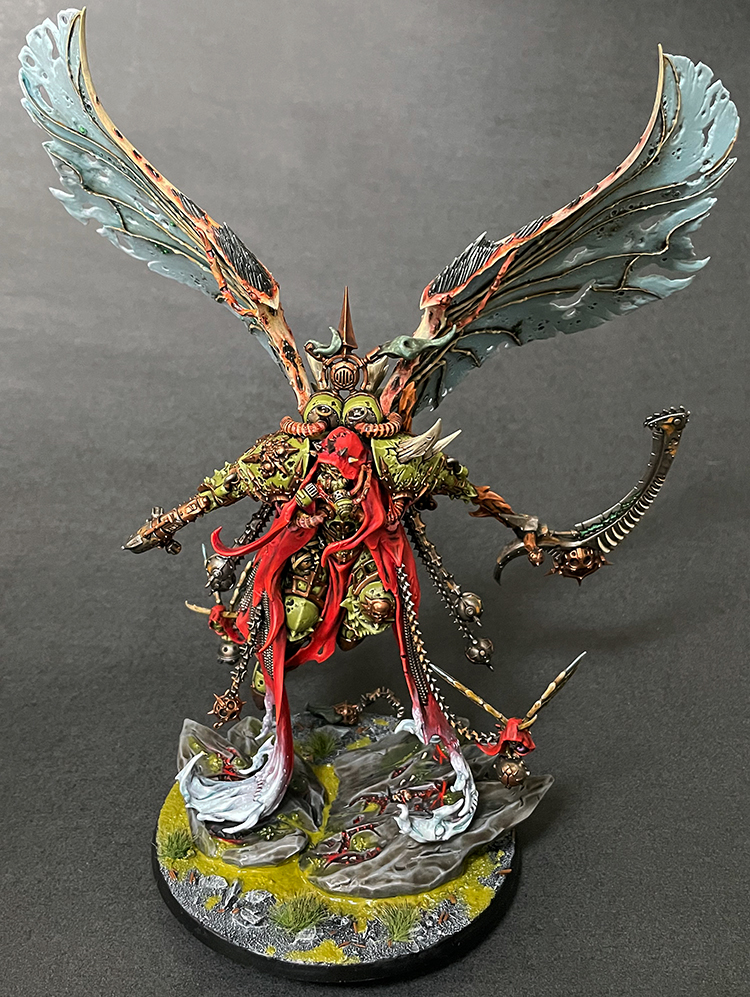
Motarion is the largest and most complicated model in the Death Guard range, a daemon primarch incorporating a mix of mechanical and organic elements, cloth, wings, and slimy buboes into a wonderful centerpiece for the army.
Just as with every model kit, there’s a number of ways to attack this build. The kit is HUGE, so if you’re up for it you can preassemble various components, paint them separately, and then carefully assemble them afterward. Personally, I’m a little too impatient for this method, and tend to completely assemble kits first even if they bite me a little for it later. Most of the details you’re going to miss are going to be hidden most of the time, right? Well, I made a minor exception for Morty, mostly because his wings are gigantic themselves and would block or impede me manipulating the model while I painted the body.
Something I always do going in is I have a vague idea of how I want my color palette to look, but I don’t set it in stone. This gives me some wiggle-room to feel things out as I go and if I hit upon something I like I hadn’t planned for I’m not going to doubt my decision to go in that direction. I started this project by painting a wing. This gave me an idea of what my final skin-tone was going to shake out to be and was relatively quick to complete.
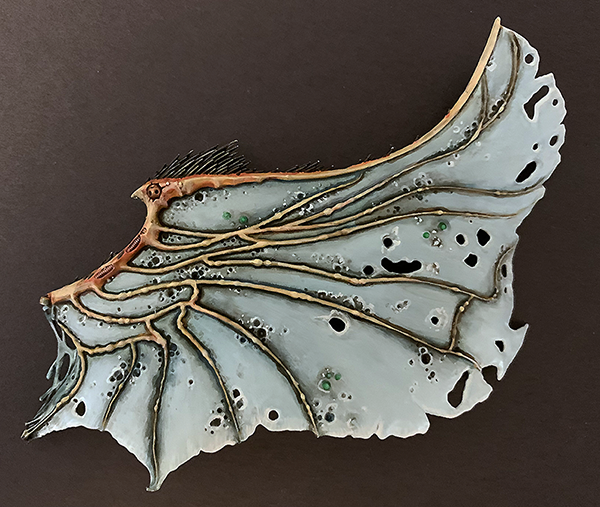
Step 1: The Wings
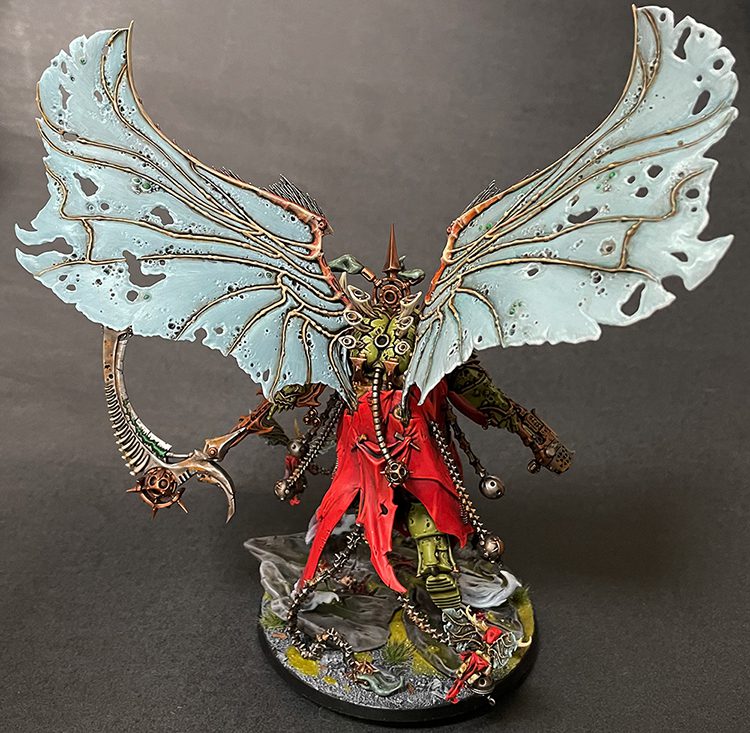
I picked up a giant bottle of Nightgaunt Gloom a while back and I’ve been finding excuses to use it. Since I was going with a contrast-y wash method with this technical paint, I primered the wings with Wraithbone spray. I washed the non-skin wing with gloom, let it dry, and then took a few passes at lightening raised areas using increasing mixes of Corax White (a “cool” white color) and Nighthaunt Gloom.
Next, I based all the skin with Balor Brown, followed by a few passes of lightly watered-down 50/50 mix of Balor Brown and Ushabti Bone on raised areas. I hit the fly-hair wing bitz with Black Templar contrast and called that a day. I like adding an infected reddish tone to Death Guard skin around where it meets other materials–to do this, I heavily watered down Evil Sunz Scarlet and gently applied that to the surrounding areas in a couple of layers.
Once I’d based the wing, I hit the entire piece with a generous wash of Agrax Earthshade. After I let that dry, I start going over all the flat surfaces with watered-down layers of the colors mentioned above until I have some nice darks in the recesses and some variation (Death Guard being somewhat mottled seemed appropriate).
I used Warpstone Glow and a light touch of Warpstone/Wraithbone on the buboes in various places, touching back up the rings around them with some shade if they need it. Finally I start going some edging around all the various holes in the wings with increasingly white 75/25 Corax/Nighthaunt, and then a final light edge of Corax-only.
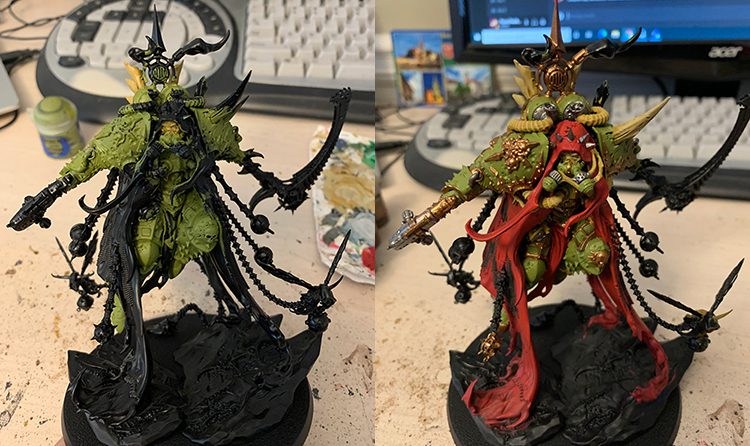
Step 2: Basecoats
Next, onto the main event. I kept mostly with the typical Death Guard scheme, which involves primarily Elysian Green for armor, Balor Brown/Ushabti Bone for skin, Wazdakka Red and Evil Sunz Scarlet for cloth, Leadbelcher for any generic metals (chains, etc.), and Balthasar Gold for the Bronze/dark gold. For the shaft of the scythe, I used Skrag Brown. Typically when doing wooden surfaces this is my go-to. This part is essentially just paint-by-numbers style basing–a crucial but extremely dull step.
The next step is to slather the whole thing in Agrax Earthshade. Make sure you don’t let too much of it pool in any one location!
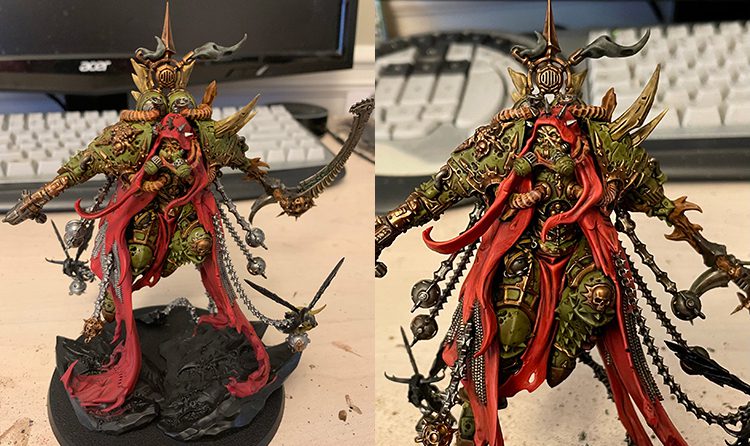
Step 3: Highlights & Shading
Once dried, I used the basing colors again on top-level surfaces to smooth things out. You can play around with this as much as you’d like. Typically on a single model I’d only do a few rising layers of color on things like cloth, but here I spent the time and make sure things transitioned smoothly. I started gently raising the colors by mixing in Wraithbone (the “warm” white), except the Evil Sunz Scarlet which gets mixed with Fire Dragon Bright (a brilliantly bright orange) instead. Unless you’re going for that effect, never lighten reds with whites or, like shirts in a wash, you’ll get pinks instead. Start uses small brushes to touch-up/edge smaller surfaces, like the scarring across his gross face and the edges of cloth.
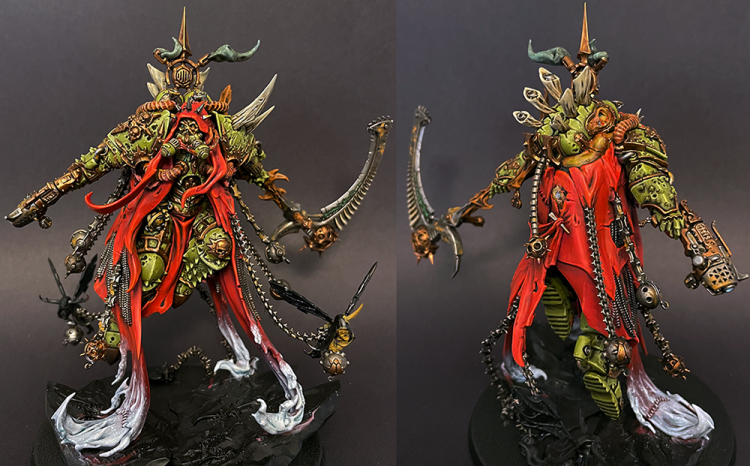
Step 4: Detailing
The next step was to add transitioning to the bottom of the cloth as it becomes spectral fire. Something a bit tricky with Mortarion is there’s not really a great sense of where it really starts so I just kind of winged it. Firstly, I started lowering the red back down, transitioning from Evil Sunz Scarlet back to Wazdakka Red, then mixing in Abaddon Black in small amounts to deepen it further. Once the red became a bit of a tinged grey, I started adding in Corax White, and continually built that back up until finally using just Corax to detail the edges. Once that part was complete, I watered down some Nighthaunt Gloom and applied that to the folds to deepen the effect and give it a touch of a blue hue.
Something I did with both the spectral fire and the smoke is I added little dots to show off flying sparks or little shimmering bits. Simple keep raising your colors from what you were using and apply dots with a very fine brush in random locations. It’s a very simple, if a little painstaking, effect that adds some extra character.
Toward the end of things, I heavily water down some Fire Dragon Bright and apply that in random locations along the silver to make rust coloration. Go over semi-large surfaces first, let that dry, then go over smaller random spots within one or two more times. It’s a cheap and quick effect that has never failed me.
Step 5: Finishing Touches
Not to get too “and then paint the rest of the owl,” but most of the next steps are pretty rinse/repeat for the attendants and the base. The grit and stone were painted using a grey mix of Abaddon Black and Wraithbone, rising up in brightness and then a final drybrush of Wraithbone. I used a liberal application of Nurgles Rot technical at the base, letting it flow from the supernatural filth that is sprouting from the stone. The open sores and sinew both on the scythe shaft and the rocks I used a mix of Secret Weapon Scenics Realistic Water and my reds (a decent approximation of Blood for the Blood God) to create a nice oozing blood effect.
With this method of subassembly, attaching the wing above the scythe-arm can be a bit tricky because the flesh-tubing above the joint makes it difficult to fit. For this reason, I had to lightly clip the tab used to attach the wing to the body to get it in. There’s still plenty of physical contact to make a good bond, so it shouldn’t be a major concern unless you’re planning on pulling really hard on a wing of your intricately painted model any time soon. Having used super glue, I then had to do some touchups around the bond where the paint became shiny from the glue. I use a brush applicator for all my gluing-needs; if you’re careful there should be much work here.
Credit: PierreTheMime
This article is part of a larger series on how to paint the Death Guard. To return to the parent article, click this link.


